Migrating from Amplitude
If you haven’t already, we recommend starting with our Migration Guides Overview as it details the key components of migrating to Mixpanel from other analytics tools. Below we outline specific steps and considerations when migrating from Amplitude.
Differences in the data models
Both Mixpanel and Amplitude are product analytics tools which collect event-based behavioral data about your users. Events are commonly expressed as JSON which represent the name of the user action, the ID of the user, the time at which the action took place, and all associated metadata. Events are immutable, and represent data at the time of which an action takes place.
{
	"event": "Signup",
	"properties":
	{
		"time": 1618716477000,
		"distinct_id": "91304156-cafc-4673-a237-623d1129c801",
		"$insert_id": "29fc2962-6d9c-455d-95ad-95b84f09b9e4",
		"Referred by": "Friend",
		"URL": "mixpanel.com/signup"
	}
}
In addition to events, Mixpanel supports an additional type of data that Amplitude does not. This data is known as user profiles, which represents dimensional data that is always updated to the most recent value for a user. User data allows you to segment your reporting by both historical point-in-time data as well as real-time dimensional data about your users.
{
	"$distinct_id": "13793",
	"$set":
	{
		"name": "Robert"
	}
}
We also support additional data for extending your use cases with Mixpanel:
- Group profiles: Used with our Group Analytics product add-on to allow you to pivot quickly between users and other entities in your analysis. A common use case is for a B2B company to pivot between analyzing users and analyzing accounts.
- Lookup tables: For event data which was already sent, you can use these to extend the data already sent into Mixpanel. A common use case is taking an identifier like a transaction ID, item ID, etc. and using lookup tables to enrich the data with additional information like the amount, category, etc. from your data warehouse.
Loading historical data
Mixpanel’s Migration Service
If you have under 15M events in Amplitude, you can migrate your historical Amplitude data using Mixpanel’s free migration service.
Note that while the migration tool is free to use, backfilling historical event data can have significant impact on your billing. Refer to this section for more details.
Here’s an example request to the migration service which you can customize:
curl --request POST \
  --url https://migrate.api.mixpanel.com/amplitude \
  --header "Content-Type: application/json" \
  --data '{
	"AMPLITUDE_API_KEY": "YOUR_AMP_KEY",
	"AMPLITUDE_API_SECRET": "YOUR_AMP_SECRET",
	"MIXPANEL_TOKEN": "YOUR_MP_TOKEN",
	"START_DATE": "YYYY-MM-DD",
	"END_DATE": "YYYY-MM-DD"
  }'
This service will use your provided credentials to export Amplitude data, transform the data, and load event + user profiles into your Mixpanel project. If no dates are provided, the service defaults to a 30 day duration relative to the present.
Watch the demo tutorial for more in-depth instructions on how to use the migration service.
Notes:
- Any events ingested via this method in the current month will count toward your plan. We recommend testing this while on a Free plan first. You may also pass a
"DRY_RUN" : trueparam in the JSON which will show you how many events will be migrated. - If you are using Mixpanel or Amplitude’s EU data residency, pass
"REGION": "EU"with your request. - This migration service is in beta — if you have questions or run into issues, please reach out to us here.
Data Warehouse Connectors
If you have access to your Amplitude data in your data warehouse, the most scalable way to bring this historical data into Mixpanel is by using our warehouse connector. At a high-level, the migration consists of 3 steps:
- Set up a new Mixpanel project which is on Simplified ID Merge system.
- Transform Amplitude data in your data warehouse (sample SQL transformation included below).
- Set up Mixpanel Warehouse Connector to initiate data sync from your data warehouse to Mixpanel.
Amplitude event schema
SQL query to flatten the JSON columns into individual columns:
SELECT
-- required fields
event_type,          -- to map Event Name
event_time,          -- to map Event Time

-- to map Insert ID
TO_HEX(SHA1(CONCAT(
      CONCAT('[amp] ', event_type),
      COALESCE(user_id, ""),
      "-",
      CAST(event_time as STRING),
      "-",
      COALESCE(CAST(amplitude_id as STRING), "")
))) AS insert_id,

-- ID management
user_id,         -- to map User ID
amplitude_id,    -- to map Distinct ID
device_id,       -- to map Device ID

-- event properties
JSON_EXTRACT_SCALAR(event_properties, "$['artist']") AS artist,
JSON_EXTRACT_SCALAR(event_properties, "$['genre']") AS genre,
JSON_EXTRACT_SCALAR(event_properties, "$['song_title']") AS song_title,
JSON_EXTRACT_SCALAR(event_properties, "$['song_name']") AS song_name,
JSON_EXTRACT_SCALAR(event_properties, "$['page_name']") AS page_name,

-- user properties as event properties
JSON_EXTRACT_SCALAR(user_properties, "$['$email']") AS email,
JSON_EXTRACT_SCALAR(user_properties, "$['$name']") AS name,
JSON_EXTRACT_SCALAR(user_properties, "$['last_genre']") AS last_genre,
JSON_EXTRACT_SCALAR(user_properties, "$['lifetime_purchase']") AS lifetime_purchase

FROM `project.dataset.tablename`
Note: Make the event_time column as NOT NULLABLE so that it can be chosen to be a Full Sync.
Amplitude does not export insert_id column but even when it is an optional field in Mixpanel, it is recommended to generate it and pass it as best practice.
Amplitude user schema
For Users too, it would be important to flatten the JSON columns into individual columns. It is also important to reduce unnecessary engage calls hence, we’ll be extracting the latest event time of that user_id to get all the user properties.
SELECT
    event_time,
    user_id,
    -- user properties
    JSON_EXTRACT_SCALAR(user_properties, "$['$email']") AS email,
    JSON_EXTRACT_SCALAR(user_properties, "$['$name']") AS name,
    JSON_EXTRACT_SCALAR(user_properties, "$['last_genre']") AS last_genre,
    JSON_EXTRACT_SCALAR(user_properties, "$['lifetime_purchase']") AS lifetime_purchase
FROM `project.dataset.tablename` t1
INNER JOIN (
    SELECT
        user_id,
        MAX(event_time) as max_event_time
    FROM `project.dataset.tablename`
    WHERE user_id IS NOT NULL
    GROUP BY user_id
) t2
ON t1.user_id = t2.user_id AND t1.event_time = t2.max_event_time
Setting up Warehouse Connectors
Once you’ve transformed your data in your data warehouse, you can set up the Mixpanel Warehouse Connector to migrate your historical data into Mixpanel. We’d recommend first sending a month of data into a test project for validation.
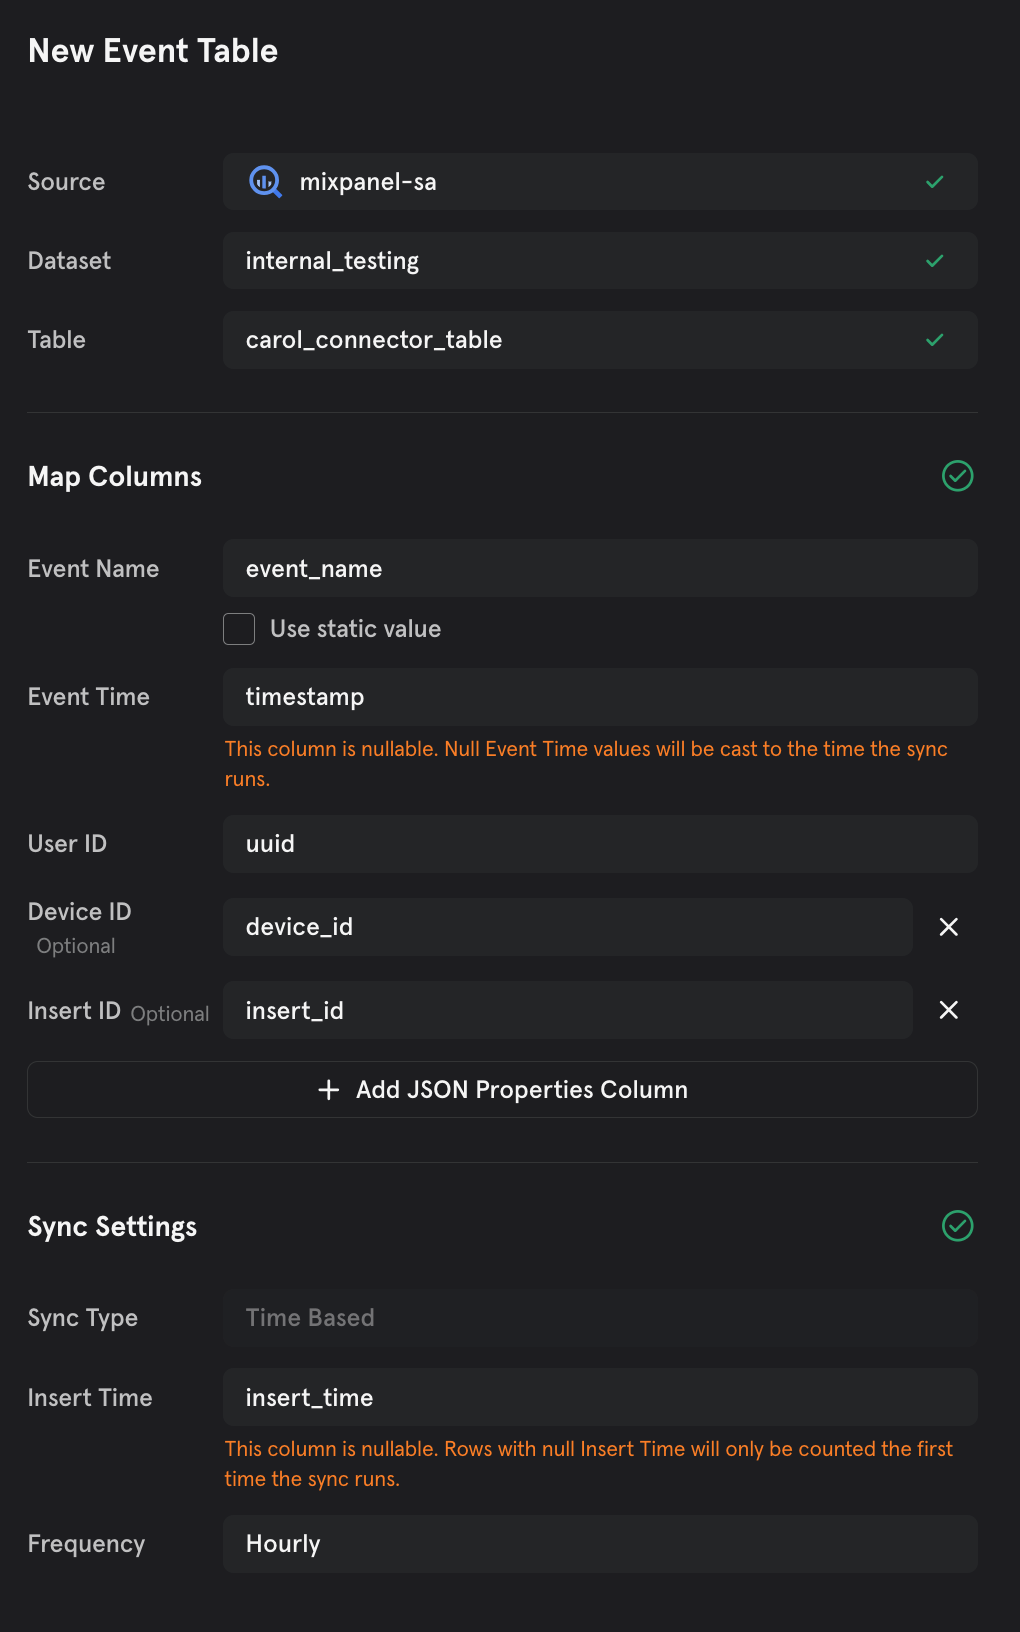
You can learn more about event mappings here. Here’s an example of mappings for event table:
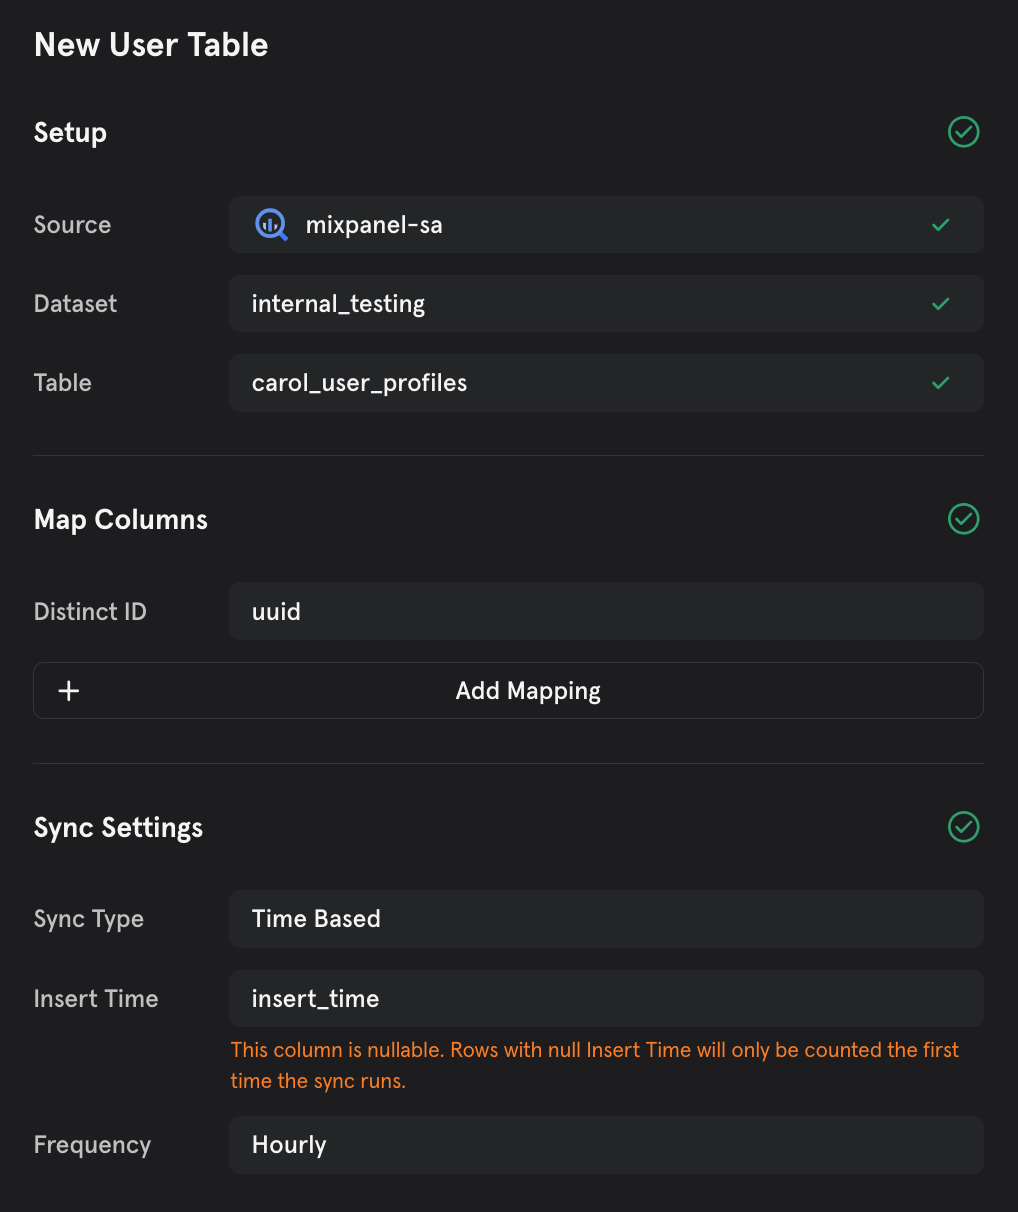
You can learn more about user mappings here. Here’s an example of mappings for user table:
Post-migration data validation
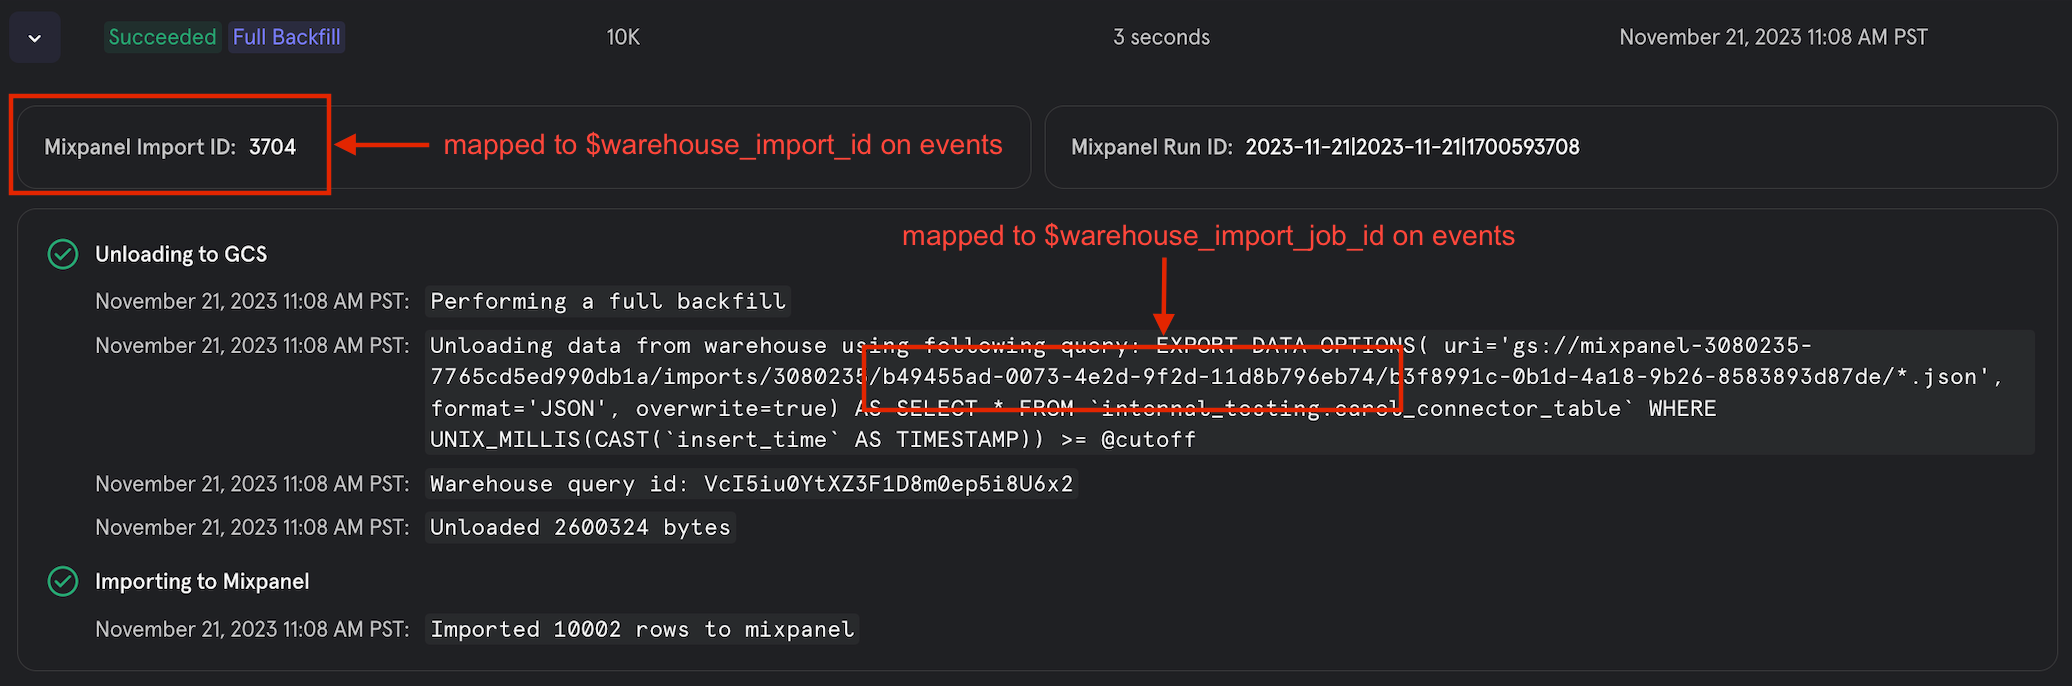
You can use our Lexicon or Events page to check that your data has successfully been ingested. However, if your historical events are older than 30 days, they will not show up on Lexicon, Events page or in the event dropdown menu across all reports. In this case, you can leverage our Insights report to validate the historical events, by selecting the import time frame and filtering by the following default properties:
- Warehouse Import ID (tracked as
$warehouse_import_id) - Warehouse Import Job ID (
$warehouse_import_job_id) - Import = true (
$import) - Source = warehouse-import (
$source)
Please filter by tracked name, $warehouse_import_id instead of the display name, “Warehouse Import ID”. You can find the properties values on the Warehouse Connector’ sync logs:
Identifying your implementation method
Mixpanel accepts event data from a variety of different sources. Choose your implementation method first and then you can follow the below steps for sending data to Mixpanel.
We support the following data collection mechanisms:
- Data Warehouse Connectors: Natively import data from Snowflake, BigQuery, Redshift, & Databricks into Mixpanel. Set up recurring syncs from your data warehouse and ensure that Mixpanel is always in sync with your trusted data.
- Client-side SDKs & Server-side SDKs: Simply replace Amplitude code calls to track events with Mixpanel calls instead
- Customer Data Platforms (CDPs) like Segment: Go into your CDP settings to add Mixpanel as a destination, and point your data stream to Mixpanel
- Import API: Point your event ingestion pipeline to Mixpanel’s robust API for data ingestion
- Reverse ETL (RETL) tools like Census: Go into your RETL settings to add Mixpanel as a destination, and point your syncs to Mixpanel
Data Warehouse Connectors
You can set up the Mixpanel Warehouse Connector to set your implementation to Mixpanel. You can learn more about event mappings here and about user mappings here.
Client-side SDKs & Server-side SDKs
Fortunately, Mixpanel and Amplitude’s client side SDKs have very similar developer facing APIs. This makes it fairly easy to “find and replace” embedded Amplitude calls and swap them for Mixpanel calls.
This section will detail the Javascript SDKs (for the sake of brevity), although both analytics platforms have fairly uniform tracking APIs for other SDKs (mobile, server-side).
Amplitude JS Docs: https://amplitude.github.io/Amplitude-TypeScript/modules/_amplitude_analytics_browser.html
Mixpanel JS Docs: https://developer.mixpanel.com/docs/javascript-full-api-reference
Note: Ensure that your projects have been defaulted or updated to Simplified ID Management before any data is sent to the project. This is the ID management compatible with Amplitude’s.
Installing the Mixpanel SDK
Before getting started, initialize the Mixpanel SDK according to the directions here
Initialization
Amplitude’s init() method:
var amplitudeClient = new AmplitudeClient();
amplitudeClient.init('API_KEY')
Mixpanel’s init() method:
mixpanel.init('new token')Events
Amplitude’s logEvent() method:
amplitudeClient.logEvent('Clicked Button', {'finished_flow': false });Mixpanel’s track() method:
mixpanel.track('Clicked Button', {'finished_flow': false })Identity Management
Amplitude’s setUserId() method:
amplitudeClient.setUserId('joe@gmail.com');Mixpanel’s identify() method:
mixpanel.identify('joe@gmail.com')User Properties
Amplitude’s setUserProperties() method:
amplitudeClient.setUserProperties({'gender': 'female', 'sign_up_complete': true})Mixpanel’s people.set() method:
mixpanel.people.set({'gender': 'female', 'sign_up_complete': true})Note: identify() should be called at some point in each user’s session to propagate people methods
Group Analytics
Amplitude’s setGroup() method:
amplitudeClient.setGroup('orgId', 15); Mixpanel’s set_group() method:
mixpanel.set_group('orgId', 15)Customer Data Platforms (CDPs)
Since CDPs already collect all your data via 1 SDK and route to many downstream destinations, enabling Mixpanel is straightforward. Simply go to your CDP settings and add Mixpanel as a destination:

Once you set up the connection to Mixpanel, you can proceed with configuring key settings like:
- Which events and properties to send → only send what matters
- Edit any mappings/editing/filtering that has to be done on the data → ensure high data quality and governance
- Connection settings, or CDP specific settings for data syncs → control over how data is sent
We provide Mixpanel as a destination and setup guides for all of the most popular CDPs:
Note depending on your CDP provider, they may also be able to help with migrating historical data as well. Features like Segment Replay enable you to quickly backfill historical data during your migration versus needing to do this work with your developer resources.
Import API
If you currently send data to Amplitude directly to their API, you can simply swap out the Amplitude API with the Mixpanel API.
Sending Events
Amplitude’s /track API Endpoint is https://api2.amplitude.com/2/httpapi (documented here). A sample request from your server for this API would look like:
curl -X POST https://api2.amplitude.com/2/httpapi \
-H 'Content-Type: application/json' \
-H 'Accept: */*' \
--data '{
    "api_key": "YOUR_API_KEY",
    "events": [{
    "user_id": "203201202",
    "device_id": "C8F9E604-F01A-4BD9-95C6-8E5357DF265D",
    "event_type": "watch_tutorial"
    }]
    }'
Mixpanel’s /track API endpoint is https://api.mixpanel.com/import (documented here). A sample request from your server for this API would look like:
curl --request POST \
 --url 'https://api.mixpanel.com/import?strict=1&project_id=%3CYOUR_PROJECT_ID%3E' \
 --header 'Content-Encoding: gzip' \
 --header 'Content-Type: application/json' \
 --header 'accept: application/json' \
 --header 'authorization: Basic cnlhbjpyeWFu' \
 --data '[
    {
        "event": "string",
        "properties": {
            "time": 0,
            "distinct_id": "string",
            "$insert_id": "string"
         }
    }
]'
The big difference between the APIs are:
- Authentication: Amplitude authenticates in the request payload, whereas Mixpanel uses your project token in the request URL alongside basic auth. Mixpanel authentication can be done via a service account as described here. Be sure to move the authentication outside the payload.
- Event JSON Structure: Amplitude and Mixpanel have slightly different structures (explained here). You will want to remap the Amplitude event format to the expected Mixpanel JSON payload as described here.
Reverse ETL (RETL)
If you already send data to Amplitude with your data warehouse as the source of truth using reverse ETL, sending data to Mixpanel requires adding a new destination and syncing the same models you have been syncing to Amplitude. This option is like a hybrid between the CDP and Import API options above - you can use the reverse ETL tool to set Mixpanel up simply as a destination and then the tool will handle all of the remapping at the API level for you.
Simply go to your RETL settings and add Mixpanel as a connection:

We provide Mixpanel as a destination and setup guides for all of the most popular RETL tools:
Not sure where to start or need help?
If you’re unsure how you currently track data, or might want to consider tracking data differently as you migrate to Mixpanel, we recommend starting here.
Mixpanel Customer Success and Support have been helping thousands of customers migrate from other tools to Mixpanel over the past decade. You can see an overview of the process we run with our Enterprise plan customers migrating from Amplitude here.
We’re always happy to discuss your team’s individual needs, our migration process, the support you’ll receive, or any other question you have — drop us a line at success@mixpanel.com.
Was this page useful?