Organizations on a paid event-based plan receive Warehouse Connector as a free add-on when they update or renew their plan. Learn more on our pricing page.
- What percentage of our Enterprise revenue uses the features we shipped last year?
- Did our app redesign reduce support tickets?
- Which account demographics have the best retention?
- We spent $50,000 on a marketing campaign, did the users we acquired stick around a month later?
Mixpanel’s Mirror sync mode keeps the data in Mixpanel fully in sync with any changes that occur in the warehouse, including updating historical events that are deleted or modified in your warehouse.
In this guide, we’ll walk through how to set up Warehouse Connectors. The integration is completely codeless, but you will need someone with access to your DWH to help with the initial setup.
Getting Started
To set up Warehouse Connectors, you must have an admin or owner project role. Learn more about Roles and Permissions. Step 1: Connect a warehouse
Navigate to Project Settings → Warehouse Sources. Select your warehouse and follow the instructions to connect it. Note: you only need to do this once.
BigQuery
Snowflake
Databricks
Redshift
Postgres
The BigQuery connector works by giving a Mixpanel-managed service account permission to read from BigQuery in your GCP project. You will need:
- Your GCP Project ID, which you can find in the URL of Google Cloud Console (
https://console.cloud.google.com/bigquery?project=YOUR_GCP_PROJECT).
- Your unique Mixpanel service account ID, which is generated the first time you create a BigQuery connection in the Mixpanel UI
(e.g.
project-?????@mixpanel-warehouse-1.iam.gserviceaccount.com).
- A new, empty
mixpanel dataset in your BigQuery instance (if you are using Mirror).
  CREATE SCHEMA `<gcp-project>`.`mixpanel`
    OPTIONS (
      description = 'Mixpanel connector staging dataset',
      location = '<same-as-the-tables-to-be-synced>',
    );
roles/bigquery.jobUser - Allows Mixpanel to run BigQuery jobs to unload data.
gcloud projects add-iam-policy-binding --member serviceAccount:<mixpanel-service-account> --role roles/bigquery.jobUser
roles/bigquery.dataViewer on the datasets and/or tables to sync. Gives Mixpanel read-only access to the datasets.
GRANT `roles/bigquery.dataViewer`
  ON SCHEMA `<gcp-project>`.`<dataset-to-be-synced>`
  TO "<mixpanel-service-account>"
roles/bigquery.dataOwner on the mixpanel dataset. Gives Mixpanel read-write access to the mixpanel dataset.
GRANT `roles/bigquery.dataOwner`
  ON SCHEMA `<gcp-project>`.`mixpanel`
  TO "<mixpanel-service-account>"
JSON columns mapped in BigQuery containing multiple properties are subject to a hard limit of 1MB per record. This limitation is imposed by Google Cloud’s handling of JSON objects and applies during the intermediate step where data is written to the GCS bucket.VPC Service Controls
IP allowlists are not supported for BigQuery because Mixpanel’s infrastructure runs on GCP, and inter-project communication in Google Cloud routes through internal Google IPs rather than public IPs. Instead, configure an ingress rule to allow access based on other attributes such as the project or service account. The service account is project-<your-project-id>@mixpanel-warehouse-1.iam.gserviceaccount.com. The Mixpanel project is 745258754925 for US, 848893383328 for EU, and 1054291822741 for IN. In addition, you may need to configure an egress rule to write data to mixpanel-warehouse-1 project 435324298685. To connect to Snowflake, you will need:
- Your Snowflake account identifier, which you can find in the
URL of your Snowflake account (
https://YOUR_ACCOUNT_NAME.snowflakecomputing.com/).
- A dedicated Mixpanel user account and role. The user account can use either key-pair or password authentication.
If using key-pair authentication, Mixpanel will generate a secure key-pair during the connection process. The public
key will be provided during the setup process, and the private key will be encrypted and stored securely.
CREATE ROLE MIXPANEL_ROLE;
# one of
CREATE USER MIXPANEL PASSWORD='?????' DEFAULT_ROLE=MIXPANEL_ROLE;
CREATE USER MIXPANEL RSA_PUBLIC_KEY='<mixpanel-provided-key>' DEFAULT_ROLE=MIXPANEL_IMPORT_ROLE;
# then
GRANT ROLE MIXPANEL_ROLE TO USER MIXPANEL;
- A Snowflake WAREHOUSE Mixpanel will use to unload data.
We recommend creating a dedicated warehouse for Mixpanel to avoid impacting other workloads.
CREATE WAREHOUSE MIXPANEL_WAREHOUSE WITH
  WAREHOUSE_SIZE = XSMALL # consider increasing for larger datasets
  AUTO_SUSPEND = 60
  AUTO_RESUME = TRUE
  INITIALLY_SUSPENDED = TRUE;
GRANT USAGE ON MIXPANEL_WAREHOUSE TO ROLE MIXPANEL_ROLE;
GRANT MONITOR ON MIXPANEL_WAREHOUSE TO ROLE MIXPANEL_ROLE;
- A Snowflake STORAGE INTEGRATION Mixpanel will
use to unload data. This integration can optionally restrict STORAGE_ALLOWED_LOCATIONS to the unique Mixpanel-managed bucket
created to receive data for this connection.
CREATE STORAGE INTEGRATION MIXPANEL_STORAGE_INTEGRATION
  TYPE = EXTERNAL_STAGE
  STORAGE_PROVIDER = 'GCS'
  ENABLED = TRUE
  STORAGE_ALLOWED_LOCATIONS = ("<mixpanel-provided-bucket-name>"); # optional
GRANT USAGE ON INTEGRATION MIXPANEL_STORAGE_INTEGRATION TO MIXPANEL_ROLE;
- A new, empty
MIXPANEL SCHEMA the Mixpanel user has the USAGE
and CREATE STREAM permission for (if you are using Mirror).
CREATE SCHEMA <database>.MIXPANEL;
GRANT USAGE ON DATABASE <database> TO ROLE MIXPANEL_ROLE;
GRANT USAGE ON SCHEMA <database>.MIXPANEL TO ROLE MIXPANEL_ROLE;
GRANT CREATE STREAM ON SCHEMA <database>.MIXPANEL TO ROLE MIXPANEL_ROLE;
- The Mixpanel user needs the
USAGE and SELECT permissions to have read-only access to any tables and views you plan to sync.
Adjust this example to fine-tune permissions.
GRANT USAGE ON DATABASE <database> TO ROLE MIXPANEL_ROLE;
GRANT USAGE ON ALL SCHEMAS IN DATABASE <database> TO ROLE MIXPANEL_ROLE;
GRANT USAGE ON FUTURE SCHEMAS IN DATABASE <database> TO ROLE MIXPANEL_ROLE;
GRANT SELECT ON ALL TABLES IN DATABASE <database> TO ROLE MIXPANEL_ROLE;
GRANT SELECT ON FUTURE TABLES IN DATABASE <database> TO ROLE MIXPANEL_ROLE;
GRANT SELECT ON ALL VIEWS IN DATABASE <database> TO ROLE MIXPANEL_ROLE;
GRANT SELECT ON FUTURE VIEWS IN DATABASE <database> TO ROLE MIXPANEL_ROLE;
GRANT SELECT ON ALL MATERIALIZED VIEWS IN DATABASE <database> TO ROLE MIXPANEL_ROLE;
GRANT SELECT ON FUTURE MATERIALIZED VIEWS IN DATABASE <database> TO ROLE MIXPANEL_ROLE;
IP Allowlist
If you are using Snowflake Network policy to restrict access to your instance, you might need to add the following IP addresses to the allowed list.US34.31.112.201
35.184.21.33
35.225.176.74
34.147.68.192
35.204.164.122
35.204.177.251
34.47.224.29
34.93.42.83
35.244.19.238
- Some users report seeing the following error
ErrorMessage=SQL compilation error: Cannot unload to an inlined external location. Please create a stage first and unload to the stage instead.. To resolve this error, you may set the following account security setting:
ALTER ACCOUNT SET PREVENT_UNLOAD_TO_INLINE_URL = FALSE;
The connection to Databricks only supports connecting directly to clusters or jobs compute. Connecting directly to SQL warehouses is not supported.
Step 1: Set up authentication
Mixpanel connects to Databricks using a service principal. You can authenticate with either a personal access token or OAuth (recommended).Option A: Service Principal OAuth (Recommended)OAuth M2M (machine-to-machine) authentication uses a client ID and client secret instead of a token. OAuth secrets can be managed and rotated without affecting other integrations.
- Create the service principal in your Databricks account if it doesn’t already exist.
- Generate an OAuth secret for the service principal:
- In your Databricks workspace, navigate to Settings → Identity and access → Service principals.
- Click on the service principal you want to use.
- Go to the Secrets tab.
- Click Generate secret.
- Copy the Client ID and Secret immediately — the secret won’t be shown again.
- Save both the Client ID and Secret — you’ll need them when connecting in Mixpanel.
Option B: Personal Access Token
- Create the service principal in your Databricks account if it doesn’t already exist.
- Generate a token for the service principal using the Databricks CLI:
databricks configure --token
databricks token-management create-obo-token <application_id_of_service_principal> --lifetime-seconds 31536000 --comment "Mixpanel warehouse connector service principal token"
- Save the generated token — you’ll need it when connecting in Mixpanel.
Step 2: Grant permissions
The user or service principal you’re connecting with needs the following permissions. The exact permissions depend on which compute type you plan to use.Compute permissions:| Permission | All-Purpose Compute | Jobs Compute |
|---|
CAN ATTACH TO on the cluster | Required | Not needed |
CAN RESTART on the cluster | Required if the cluster auto-suspends | Not needed |
| Cluster creation permissions | Not needed | Required |
GRANT SELECT ON ANY FILE TO `<application_id_or_username>`;
GRANT MODIFY ON ANY FILE TO `<application_id_or_username>`;
Step 3: Connect in Mixpanel
- Navigate to Project Settings, then select Warehouse Sources.
- Click on
+ Add Connection and select Databricks.
- Fill out the following fields, then click Create Source:
- Server Hostname — The hostname of your Databricks workspace. Find this in your workspace URL, or under your cluster’s JDBC/ODBC settings.
- Authentication — Choose one of the following:
- Personal Access Token — The service principal token from Option A above.
- OAuth Client ID and OAuth Client Secret — The client credentials from Option B above.
- Compute Type — Select your preferred compute option:
- All-Purpose Compute — Uses an existing cluster. Faster sync start times, but the cluster stays running after the sync completes until it times out. Best for development.
- Jobs Compute (Beta) — Creates a dedicated job for each sync. You’re only billed for the exact job duration, making it more cost-effective. Syncs take ~5-6 minutes longer to start due to cluster spin-up, and data preview in the Mixpanel UI is not supported. Best for production.
- HTTP Path — For all-purpose compute, the HTTP path of your cluster. Find this under your cluster’s JDBC/ODBC settings.
- Confirm that the credentials are validated and the source is added.
IP Allowlist
If you are using IP Access List to restrict access to your instance, you might need to add the following IP addresses to the allowed list.US34.31.112.201
35.184.21.33
35.225.176.74
34.147.68.192
35.204.164.122
35.204.177.251
34.47.224.29
34.93.42.83
35.244.19.238
Complete the following steps to get your Redshift connector up and running:
- Navigate to Project Settings, then select Warehouse Sources.
- Click on
+ Add Connection and select Redshift.
- You should see a new page to create your Redshift connector. In the first view, fill out the following fields before clicking
Next:
- AWS Account ID - This is the AWS account ID that can be found in the dropdown in the AWS Redshift Console.
- Cluster ID - This is the name of the Redshift cluster.
- In the second view, you will need to add the following.
- AWS Region - The region code in which your Redshift cluster resides.
- S3 Staging Bucket - This is the name of S3 staging bucket you need to create. We’ll use it to extract data from your Redshift tables before importing the data into Mixpanel.
- Copy the command generated below in the AWS CLI to create the S3 Staging Bucket with the name you specified.
- Database Name - Input the name of the Database where the tables you want to import are stored.
- (Optional) Policy Name - This is an optional name for the policy, which contains role permissions that you need to grant the Mixpanel Service Account. After inputting a policy name, you can either copy-paste the JSON in the AWS UI or copy-paste the inline command line version that we generate and run in the AWS CLI.
- Role Name - Input the name of the role. After inputting a role name, you can either copy-paste the JSON in the AWS UI or copy-paste the inline command line version that we generate and run in the AWS CLI. Running this command grants the Mixpanel Service Account the necessary permissions to read and export data from your Redshift tables.
- Finally, attach the policy you created to the role you created by copy-pasting the command in the AWS CLI.
- Then, click
Create Source.
- In the third view, you should see a confirmation that your source was created. To establish the source connection, we need to ping your Redshift instance to actually create the service account user.
- Grant Access to Schema - Enter the name of the schema you want to grant Mixpanel access to.
- Copy the command generated and run it in your Redshift worksheet. Once that command is run successfully, the connection will be established, and you will be able to send data from Redshift tables to Mixpanel.
IP Allowlist
If you are using AWS PrivateLink to restrict access to your instance, you might need to add the following IP addresses to the allowed list.US34.31.112.201
35.184.21.33
35.225.176.74
34.147.68.192
35.204.164.122
35.204.177.251
34.47.224.29
34.93.42.83
35.244.19.238
Complete the following steps to get your Postgres connector up and running:
- Navigate to Project Settings, then select Warehouse Sources.
- Click on
+ Add Connection and select Postgres.
- You should see a new page to create your Postgres connector. Fill out the following fields:
- Server Hostname - This is the hostname or IP address of your Postgres database.
- Port - This is the port your database server is listening to. The default is
5432.
- Database - This is the name of the database you want to connect to.
- User Name - This is the username you want to connect with. The user should have read-only permissions on your Postgres instance, as Mixpanel only needs to read data. Follow the principle of least privilege by granting access only to the specific schemas and tables you intend to sync.
- Password - This is the password for the user you want to connect with.
- Postgres SSL Mode - To keep your data secure, Mixpanel requires encryption for Postgres connections. You can choose between two SSL modes:
- verify-full (default, recommended) - Verifies both the server certificate and that the hostname matches the certificate.
- verify-ca - Verifies the server certificate against a trusted certificate authority.
- Server CA Certificate (Optional) - If your cloud provider doesn’t use a public certificate registry (e.g., Google Cloud SQL, Supabase), you can upload a CA bundle as a PEM file to authenticate your server.
- SSH Tunnel (Optional) - If you need to connect through an SSH tunnel, enable and configure the following:
- Bastion Hostname - The hostname of your SSH server.
- Bastion Port - The port your SSH server is listening on.
- SSH Username - The username for SSH authentication.
- SSH Private Key - Paste the contents of your private key file. At this time, only non-encrypted private keys are supported.
- Then, click
Create Source.
The Postgres connector only supports IPv4 connections. If you are using a database provider like Supabase, you may need to explicitly use an IPv4 connection.
IP Allowlist
If you are using network policies or firewall rules to restrict access to your Postgres instance, you might need to add the following IP addresses to the allowed list.US34.170.209.182
34.59.17.26
35.226.128.70
34.132.69.227
34.6.165.244
34.13.194.46
34.14.173.30
35.244.32.37
Step 2: Load a warehouse table
Navigate to Project Settings → Warehouse Data and click +Event Table.
Select a table or view representing an event from your warehouse and tell Mixpanel about the table. Once satisfied with the preview, click Run, and we’ll establish the sync. The initial load may take a few minutes depending on the size of the table; we show you progress as it’s happening.
🎉 Congrats, you’ve loaded your first warehouse table into Mixpanel! From this point onward, the table will be kept in sync with Mixpanel. You can now use this event throughout Mixpanel’s interface.
Table Types
Mixpanel’s Data Model consists of 4 types: Events, User Profiles, Group Profiles, and Lookup Tables. Each has properties, which are arbitrary JSON. Warehouse Connectors lets you turn any table or view in your warehouse into one of these 4 types of tables, provided they match the required schema.
Events
An event is something that happens at a point in time. It’s akin to a “fact” in dimensional modeling or a log in a database. Events have properties, which describe the event. Learn more about Events here.
Here’s an example table that illustrates what can be loaded as events in Mixpanel. The most important fields are the timestamp (when) and the user ID (who) — everything else is optional.
| Timestamp | User ID | Item | Brand | Amount | Type |
|---|
| 2024-01-04 11:12:00 | alice@example.com | shoes | nike | 99.23 | in-store |
| 2024-01-12 11:12:00 | bob@example.com | socks | adidas | 4.56 | online |
| Column | Required | Type | Description |
|---|
| Event Name | Yes | String | The name of the event. E.g.: Purchase Completed or Support Ticket Filed. Note: you can specify this value statically, it doesn’t need to be a column in the table. |
| Time | Yes | Timestamp | The time at which the event occurred. |
| User ID | No | String or Integer | The unique identifier of the user who performed the event. E.g.: 12345 or grace@example.com. |
| Device ID | No | String or Integer | An identifier for anonymous users, useful for tracking pre-login data. Learn more here |
| JSON Properties | No | JSON or Object | A field that contains key-value properties in JSON format. If provided, Mixpanel will flatten this field out into properties. |
| All other columns | No | Any | These can be anything. Mixpanel will auto-detect these columns and attach them to the event as properties. |
User Profiles
A User Profile is a table that describes your users. It’s akin to a “dimension” in dimensional modeling or a relational table in a database. Learn more about User Profiles here.
Here’s an example table that illustrates what can be loaded as user profiles in Mixpanel. The only important column is the User ID, which is the primary key of the table.
| User ID | Email | Name | Subscription Tier |
|---|
| 12345 | grace@example.com | Grace Hopper | Pro |
| 45678 | bob@example.com | Bob Noyce | Free |
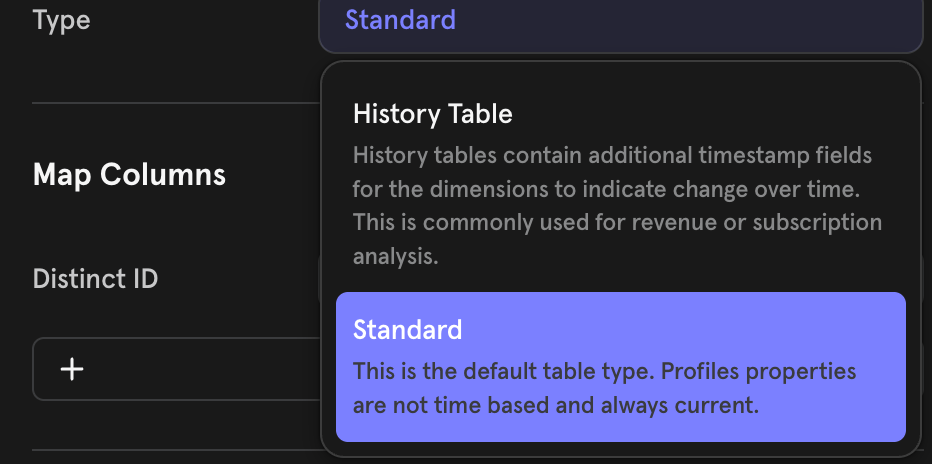
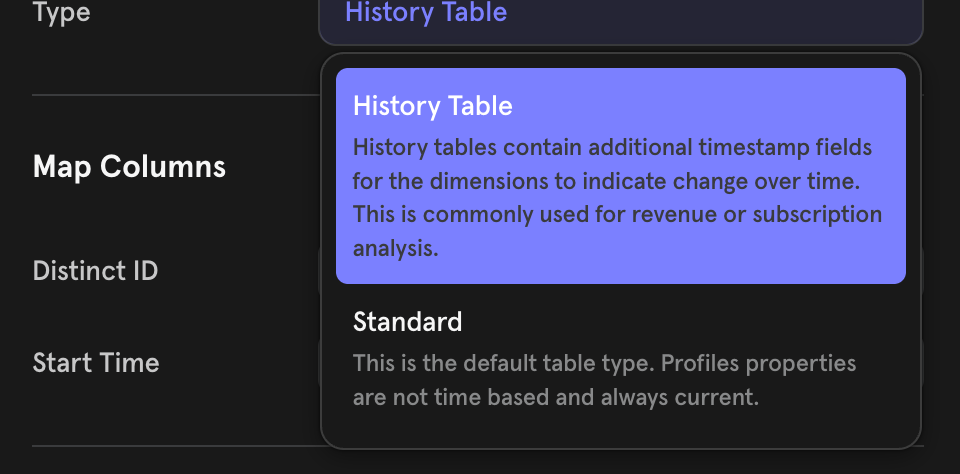
Profile History tables
Profile History tables are only available to organizations on an Enterprise plan.
- The source table for user/group history is expected to be modeled as an SCD (Slowly Changing Dimension) Type 2 table. This means that the table must maintain all the history over time that you want to use for analysis.
- History tables are supported only with Mirror Sync mode. Follow these docs to set up your source table to be mirror-compatible.
- The table should have a Timestamp/Date type column signifying the time that the properties on the row become active. This column will need to be supplied as
Start Time in the sync configuration.
- The following data types are NOT supported:
- Lists (eg, Snowflake’s ARRAY)
- Objects (e,g Snowflake’s OBJECT)
Group Profiles
A Group Profile is a table that describes an entity (most often an Account, if you’re a B2B company). They are functionally identical to User Profiles, just used for other non-User entities. Group Profiles are only available if you have the Group Analytics add-on. Learn more about Group Analytics here.
Here’s an example table that illustrates what can be loaded as group profiles in Mixpanel. The only important column is the Group Key, which is the primary key of the table.
| Group Key | Name | Domain | ARR | Subscription Tier |
|---|
| 12345 | Notion | notion.so | 45000 | Enterprise |
| 45678 | Linear | linear.so | 2000 | Pro |
Lookup Tables
A Lookup Table is useful for enriching Mixpanel properties (e.g., content, SKUs, currencies) with additional metadata. Learn more about Lookup Tables here. Note the limits of lookup tables indicated here.
Here is an example table that illustrates what can be loaded as a lookup table in Mixpanel. The only important column is the ID, which is the primary key of the table that is eventually mapped to a Mixpanel property
| ID | Song Name | Artist | Genre |
|---|
| 12345 | One Dance | Drake | Pop |
| 45678 | Voyager | Daft Punk | Electronic |
Sync Modes
Warehouse Connectors regularly check warehouse tables for changes to load into Mixpanel. The Sync Mode determines
which changes Mixpanel will reflect.
- Mirror will keep Mixpanel perfectly in sync with the data in the warehouse. This includes syncing new data,
modifying historical data, and deleting data that was removed from the warehouse. Mirror is supported
for Snowflake, BigQuery, Databricks, and Redshift.
- Append will load new rows in the warehouse into Mixpanel, but will ignore modifications to existing rows
or rows that were deleted from the warehouse. We recommend using Mirror over Append for supported
warehouses.
- Full will reload the entire table to Mixpanel each time it runs rather than tracking changes between runs. Full
syncs are only supported for Lookup Tables, User Profiles, and Group Profiles.
- One-Time will load the data from your warehouse into Mixpanel once with no ability to send incremental
changes later. This is only recommended where the warehouse is being used as a temporary copy of the data being
moved to Mixpanel from some other source, and the warehouse copy will not be updated later.
Mirror
Mirror syncs work by having the warehouse compute which rows have been inserted, modified, or deleted and sending this
list of changes to Mixpanel. Change tracking is configured differently depending on the source warehouse. Mirror is
supported for Snowflake, Databricks, BigQuery, and Redshift sources.
For User tables, Mirror Sync is available only when you select the Profile History table type. Mirror Sync is not available for the Standard table type.
BigQuery
Snowflake
Databricks
Redshift
Mirror takes BigQuery table snapshots and runs queries to compute the
change stream between two snapshots. Snapshots are stored in the mixpanel dataset created in Step 1.Considerations when using Mirror with BigQuery:
- Mirror is not supported on views in BigQuery.
- If two rows in BigQuery are identical across all columns, the checksums Mirror computes for each row will be the same,
and Mixpanel will consider them the same row, causing only one copy to appear in Mixpanel. We recommend ensuring that one
of your columns is a unique row ID to avoid this.
- The table snapshots managed by Mixpanel are always created to expire after 21 days. This ensures that the snapshots are
deleted even if Mixpanel loses access to them unexpectedly. Make sure that the sync does not go longer than 21 days without
running, as each sync run needs access to the previous sync run’s snapshot (under normal conditions, Mirror maintains only one
snapshot per sync and removes the older run’s snapshot as soon as it has been used by the subsequent sync run).
How changes are detected:Changed rows are detected by checksumming the values of all columns except trailing NULL-valued columns. For example, in the following table
would use these per-row checksums:| ID | Song Name | Artist | Genre | Computed checksum |
|---|
| 12345 | One Dance | Drake | NULL | CHECKSUM(12345, 'One Dance', 'Drake') |
| 45678 | Voyager | Daft Punk | Electronic | CHECKSUM(45678, 'Voyager', 'Daft Punk', 'Electronic') |
| 83921 | NULL | NULL | Classical | CHECKSUM(83921, NULL, NULL, 'Classical') |
ALTER TABLE songs ADD COLUMN Tag STRING NULL;
| ID | Song Name | Artist | Genre | Tag | Computed checksum |
|---|
| 12345 | One Dance | Drake | NULL | NULL | CHECKSUM(12345, 'One Dance', 'Drake') |
| 45678 | Voyager | Daft Punk | Electronic | NULL | CHECKSUM(45678, 'Voyager', 'Daft Punk', 'Electronic') |
| 83921 | NULL | NULL | Classical | NULL | CHECKSUM(83921, NULL, NULL, 'Classical') |
| ID | Song Name | Artist | Genre | Tag | Computed checksum |
|---|
| 12345 | One Dance | Drake | NULL | tag1 | CHECKSUM(12345, 'One Dance', 'Drake', NULL, 'tag1') |
| 45678 | Voyager | Daft Punk | Electronic | tag2 | CHECKSUM(45678, 'Voyager', 'Daft Punk', 'Electronic', 'tag2') |
| 83921 | NULL | NULL | Classical | NULL | CHECKSUM(83921, NULL, NULL, 'Classical') |
ALTER TABLE <table> ADD COLUMN <column> STRING NULL;
JSON Properties in the import setup, as the whole JSON object for that column is used to calculate the checksum for the row, any changes to the JSON object will result in a change to the checksum, even if the change is to add new keys with null values. As such, consider conditional formatting when building the JSON object to only update it when a new non-null value is available for a row.We recommend avoiding other types of schema changes on large tables. Other schema changes may cause the
checksum of every row to change, effectively re-sending the entire table to Mixpanel. For example, if we
were to remove the Genre column in the example above, the checksum of every row would be different:| ID | Song Name | Artist | Tag | Computed checksum |
|---|
| 12345 | One Dance | Drake | tag1 | CHECKSUM(12345, 'One Dance', 'Drake', 'tag1') |
| 45678 | Voyager | Daft Punk | tag2 | CHECKSUM(45678, 'Voyager', 'Daft Punk', 'tag2') |
| 83921 | NULL | NULL | NULL | CHECKSUM(83921) |
Mirror uses Snowflake Streams to track changes to Snowflake
tables or views. The only requirement to use Mirror on a Snowflake table or view is to enable
change tracking:ALTER TABLE <table> SET CHANGE_TRACKING = TRUE;
# or
ALTER VIEW <view> SET CHANGE_TRACKING = TRUE;
MIXPANEL schema created in Step 1.Considerations when using Mirror with Snowflake:
- Snowflake Streams only maintain change tracking metadata for a limited number of days determined by
the larger of DATA_RETENTION_TIME_IN_DAYS and MAX_DATA_EXTENSION_TIME_IN_DAYS
(default is 14 days for MAX_DATA_EXTENSION_TIME_IN_DAYS). Make sure that the Mixpanel sync
does not go longer than this number of days without running. Mixpanel recommends leaving the default of 14
days to ensure that if Mixpanel loses access to the warehouse unexpectedly (e.g., a credentials change), there
is time to correct the issue.
- Snowflake Streams do not work if a table is deleted and re-created with the same name. If using a tool like DBT to model
data in Snowflake, make sure to use an incremental model so that
DBT does not replace the table each time it runs.
- Snowflake streams don’t capture changes when a column is deleted or renamed, so deletion of columns won’t be synced to Mixpanel.
- Snowflake has specific requirements when using Streams on Views
that must be met when using Mirror with views.
- While Snowflake Streams are a very efficient way of tracking changes, there are some performance implications
when using Streams on VIEWs that contain JOINs.
If you find yourself needing such a JOIN in event data, we recommend considering if syncing the joined data as User Profiles,
Group Profiles, or a Lookup Table would work instead.
Handling schema changes when using Mirror with Snowflake:
Adding new, default-NULL columns to Mirror-tracked tables/views is fully supported.ALTER TABLE <table> ADD COLUMN <column> VARCHAR DEFAULT NULL;
Mirror uses Databricks Change Data Feed to track changes to Databricks tables.
The only requirement to use Mirror on a Databricks table is to enable change data feed on those entities.ALTER TABLE <table> SET TBLPROPERTIES (delta.enableChangeDataFeed = true);
- Mirror is not supported on views in Databricks
- Databricks Change Data Feed only maintains change history for a limited number of days determined by delta.logRetentionDuration (default is 30 days). Make sure that the Mixpanel sync does not go longer
than this number of days without running. Mixpanel recommends leaving the default of 30 days to ensure that if Mixpanel loses access to the warehouse unexpectedly (e.g., a credentials change), there is time to correct the issue.
- Databricks Change Data Feed does not work if a table is deleted and re-created with the same name. If using a tool like DBT to model
data in Databricks, make sure to use an incremental model so that
DBT does not replace the table each time it runs.
- While Databricks Change Data Feed works with adding new columns to the table, there are certain limitations when it comes to dropping columns or renaming columns
that use column mappings. In such scenarios, Mixpanel recommends deleting the sync (along with the data) and re-creating the sync.
Mirror takes Redshift table snapshots and runs queries to compute the change stream between two snapshots using the computed MD5 hash value for each row. Snapshots are stored in a staging schema created in Step 1.
- If two rows in the Redshift table are identical across all columns, the md5 hash value Mirror computes for each row will be the same, and Mixpanel will consider them the same row, causing only one copy to appear in Mixpanel. We recommend ensuring that one of your columns is a unique row ID to avoid this.
- The table snapshots managed by Mixpanel are automatically cleaned up. Under normal conditions, Mirror maintains only one snapshot per sync and removes the older run’s snapshot as soon as it has been used by the subsequent sync run. These snapshots will incur some additional storage cost.
How changes are detected:Changed rows are detected by computing the MD5 hash for concatenated values of all columns except trailing NULL-valued columns. For example, in the following table would use these per-row MD5:| ID | Song Name | Artist | Genre | Computed checksum |
|---|
| 12345 | One Dance | Drake | NULL | MD5(12345, 'One Dance', 'Drake') |
| 45678 | Voyager | Daft Punk | Electronic | MD5(45678, 'Voyager', 'Daft Punk', 'Electronic') |
| 83921 | NULL | NULL | Classical | MD5(83921, NULL, NULL, 'Classical') |
ALTER TABLE songs ADD COLUMN Tag STRING NULL;
| ID | Song Name | Artist | Genre | Tag | Computed checksum |
|---|
| 12345 | One Dance | Drake | NULL | NULL | MD5(12345, 'One Dance', 'Drake') |
| 45678 | Voyager | Daft Punk | Electronic | NULL | MD5(45678, 'Voyager', 'Daft Punk', 'Electronic') |
| 83921 | NULL | NULL | Classical | NULL | MD5(83921, NULL, NULL, 'Classical') |
| ID | Song Name | Artist | Genre | Tag | Computed checksum |
|---|
| 12345 | One Dance | Drake | NULL | tag1 | MD5(12345, 'One Dance', 'Drake', NULL, 'tag1') |
| 45678 | Voyager | Daft Punk | Electronic | tag2 | MD5(45678, 'Voyager', 'Daft Punk', 'Electronic', 'tag2') |
| 83921 | NULL | NULL | Classical | NULL | MD5(83921, NULL, NULL, 'Classical') |
ALTER TABLE <table> ADD COLUMN <column> STRING NULL;
| ID | Song Name | Artist | Tag | Computed checksum |
|---|
| 12345 | One Dance | Drake | tag1 | MD5(12345, 'One Dance', 'Drake', 'tag1') |
| 45678 | Voyager | Daft Punk | tag2 | MD5(45678, 'Voyager', 'Daft Punk', 'tag2') |
| 83921 | NULL | NULL | NULL | MD5(83921) |
- Currently, only the add-column schema update is supported.
- Geography, Geometry, Varbyte, and hllsketch are not supported currently. If you have a use case that requires support for any of these columns, please contact us for a feature request.
- Any new tables created after the permissions are granted are not automatically accessible by Mixpanel. Please re-grant the necessary permissions to be able to set up Mirror on the tables.
_mp_row_hash and _mp_change_type are reserved column names used for tracking the computed hash value for each row, and updating the type of the row. Please ensure that this doesn’t conflict with the column names of the table.
Append
Append syncs require an Insert Time column in your table. Mixpanel remembers the maximum Insert Time it saw in the previous run of the sync and looks for only rows that have an Insert Time greater than that. This is useful and efficient for append-only tables (usually events) that have a column indicating when the data was appended.
Each time an Append sync runs, it will query the source table with a WHERE <insert_time_column> > <previous_max_insert_time> clause. This means that records added with an append time value before the <previous_max_insert_time> from the previous run can be missed (not imported) as they would be considered already ingested. The <insert_time_column> value should always reflect when the value was made available for Mixpanel to query and ingest.
Considerations when using Append with large BigQuery tables:
In an un-partitioned BigQuery table, the <insert_time_column> filtering results in a full scan of all data in the source table each time the sync runs. To minimize
BigQuery costs we recommend
partitioning the source table by the <insert_time_column>.
Doing so will ensure that each incremental sync run only scans the most recent partitions.
To understand the potential savings, consider a 100 GB source table with 100 days of data (approximately 1 GB of data per day):
- If this table is not partitioned and is synced daily, the Append sync will scan the whole table (100 GB of data) each time it runs, or 3,000 GB of data per month.
- If this table is partitioned by day and is synced daily with an Append sync, the Append sync only scans the current day and the previous day’s partitions (2 GB of data) each time it runs, or 60 GB of data per day, a 50x improvement over the un-partitioned table.
Note: BigQuery’s ingestion time partitions are not supported in Append mode.
Full
Full syncs periodically make a snapshot of the source table and sync it entirely to Mixpanel. If a row has new properties in your warehouse, the corresponding profile in Mixpanel will be overridden with those new properties. This mode is available for all tables except events.
Sync Frequency
Mixpanel offers a variety of sync frequency options to cater to different data integration needs. These options allow you to choose how often your data is synchronized from your data warehouse to Mixpanel, ensuring your data is up-to-date and accurate.
Standard Sync Frequency Options
GA4 tables support only a daily sync frequency.
- Hourly: Data is synchronized every hour, providing near real-time updates to your Mixpanel project.
- Daily: Data synchronization occurs once a day, ideal for daily reporting and analytics.
- Weekly: Data is synchronized once a week, suitable for less frequent reporting needs.
Advanced Sync Frequency Option: Trigger via API
For more advanced synchronization needs, Mixpanel offers the ability to trigger syncs via API. This option generates a PUT URL that customers can use in their code to orchestrate Mixpanel sync jobs with other jobs, such as Fivetran pipelines or dbt jobs. By using this API trigger option, you can ensure 100% accuracy by aligning Mixpanel syncs with other critical data operations.
To use the API trigger option:
- Select Advanced>Trigger Via API under Sync Frequency in the table sync creation UI.
- After creating the sync, we will generate a PUT URL for you.
- Integrate this URL into your existing workflows or scripts.
- Authenticate the request with a Mixpanel Service Account. More information on setting up and using Mixpanel Service Accounts can be found here.
- Trigger the sync job programmatically, ensuring it runs in coordination with other data processes.
This flexibility allows you to maintain precise control over when and how your data is updated in Mixpanel, ensuring your analytics are always based on the latest information.
Note: If your table sync is set up with Mirror mode, you will need to run a sync job at least every 2 weeks to ensure our snapshots do not get deleted. We rate-limit the number of syncs via API to 5 per hour.
FAQ
What tables are valuable to load into Mixpanel?
Anything that is event-based (has a user_id and timestamp) and that you want to analyze in Mixpanel. Examples, by data source are:
- CRM: Opportunity Created, Opportunity Closed
- Support: Ticket Created, Ticket Closed
- Billing: Subscription Created, Subscription Upgraded, Subscription Canceled, Payment Made
- Application Database: Sign-up, Purchased Item, Invited Teammate
We also recommend loading your user and account tables to enrich events with demographic attributes about the users and accounts who performed them.
How fast do syncs transfer data?
Syncs have a throughput of ~30K events+updates/second or ~100M events+updates/hour.
What is the best way to start bringing in event data?
We recommend starting with a subset of data in a materialized view to test the import process. This allows you to ensure that relevant columns are correctly formatted and the data appears as expected in Mixpanel. Once the data is imported, run a few reports to verify that you can accurately gain insight into your team’s KPIs with the way your data is formatted.
After validating your use case, navigate to the imported table and select “Delete Import” to hard delete the subset data. This step ensures that you can then import the entire table without worrying about duplicate data.
I already track data to Mixpanel via SDK or CDP, can I still use Warehouse Connectors?
Yes! You can send some events (eg, web and app data) directly via our SDKs and send other data (eg, user profiles from CRM or logs from your backend) from your warehouse and analyze them together in Mixpanel.
Please do note that warehouse connectors enforce strict_mode validation by default, and any events and historical profiles with time set in the future will be dropped.
We will reject events with time values that are before 1971-01-01 or more than 1 hour in the future as measured on our servers.
We recommend that the customer filter such events and refresh such events when they are no longer set in the future.
How do I filter for events coming to Mixpanel via Warehouse Connector Sync in my reports?
We add a couple of hidden properties, $warehouse_import_id and $warehouse_type, on every event ingested through warehouse connectors. You can add filters and breakdowns on that property in any Mixpanel report. You can find the Warehouse import ID of a sync in the Sync History tab shown as Mixpanel Import ID.
Does Mixpanel automatically flatten nested data from warehouse tables?
Automatic flattening is only available for GA4 tables. For other tables, you’ll need to manually flatten the data via queries before import.
What should I do if my BigQuery import query is too large or takes too long?
Consider breaking the data into smaller chunks if you’re working with large datasets. You can do this by creating views in BigQuery that only include the data you want to import — for example, limiting it to the past 6 months or 1 year.
Note: The 20-hour query limit is a Mixpanel restriction, not a BigQuery one, to help keep the system stable for all users.
Why is mirror mode required for profile history syncs?
Mirror mode allows Mixpanel to detect changes in your data warehouse and update historical profile data in Mixpanel accordingly. This is essential for maintaining an accurate history of user profiles. When you use the Mirror mode, Mixpanel data automatically syncs with your warehouse by accurately reflecting all changes, including additions, updates, or deletions. You can learn more about the Mirror mode and its benefits in this blog post
Why am I seeing events in my project with the name of my profile table?
Events with the same name as the table/view used for historical profile imports are auto-generated by the WH import process. These are hidden by default and are not meant to be queried directly. Billing for historical imports is done using mirror pricing (link to question below).
Billing FAQ
What actions impact billing for warehouse connectors?
Billing varies by operation type and connector mode. The tables below explain how each action affects your monthly event volume:
Billing for Event Syncs:
| Event Operation | Sync Type | Supported | Billed |
|---|
| Events | One time | ✅ | ✅ |
| Append | ✅ | ✅ |
| Mirror | ✅ | ✅ |
| Updates & deletes | One time | ❌ | ❌ |
| Append | ❌ | ❌ |
| Mirror | ✅ | ✅ |
- Event inserts are billed only if the event timestamp is in the current billing month. Events with timestamps in previous months are not billed.
- Updates and deletes are always billed at ingestion time, regardless of the event timestamp on the original event. More details on ingestion time vs. event timestamp billing can be found in this section.
If you’re planning on backfilling a significant amount of historical events and need help understanding how it will impact your costs, please reach out to your Mixpanel account manager or contact support.
Note on Updates: If you already have an event in Mixpanel, for example, Event A with properties a,b,c,d, but want to:
- Update the value of property d, or
- Add a new property or column e with a non-NULL value
This will count as an update event for each row in the sync.
If your warehouse workflow drops and recreates tables, Mirror will treat this as a full delete and re-insert, with each row counted as a billable event. Mirror looks at the data already ingested into Mixpanel and uses warehouse-specific logic to identify changes made within your warehouse platform. In the case of a full table delete, Mixpanel will register each deleted row as a billable event, and the same applies when the table is recreated.
If instead your workflow updates existing tables—by appending, updating, or deleting specific rows or columns—only the affected rows will be billed, as shown in the table above.
Note on Backfills: You can also backfill using Append mode if you create a new sync. But for an ongoing sync, you cannot backfill for older days within the existing sync once the insert_time has moved past.
Billing for User/Group Profiles Syncs
| Profile Operation | Mode | Sync Type | Supported | Billed |
|---|
| Set/update profile properties | Standard | Full sync | ✅ | ❌ |
| Standard | Append | ✅ | ❌ |
| History | Mirror | ✅ | ✅ |
| Remove profile properties | Standard | Full sync | ❌ | ❌ |
| Standard | Append | ❌ | ❌ |
| History | Mirror | ✅ | ✅ |
- Historical profile updates DO count towards billing. Imports through standard profile tables do not.
- Every row counts as a mirror event and is billed as such.
- If you update/delete existing rows in your table, mirror billing will be applied, including for backfills.
For MTU plans, the events and updates/deletes don’t directly affect the MTU tally unless the volume of events and updates pushes the threshold for the guardrail (by default, 1000 events per user); once the threshold for the guardrail is crossed, events and updates from profile history tables will also count towards billing.
When should I use Mirror vs. Append mode?
Use Mirror mode when:
- You want to maintain a replica of your warehouse data in Mixpanel
- You want to automatically sync updates and deletes from your warehouse
- You need to track the history of user profile changes over time (with History mode)
Use Append mode when:
- You only need to add new data without updating existing records
- You have a workflow that frequently drops and recreates tables
For large-scale changes that might significantly impact billing, we recommend consulting with your Account Manager before proceeding.
What will be the cost impact of this on my DWH?
The DWH cost of using a warehouse connector will vary based on the source warehouse and sync type used. Our connectors use warehouse-specific change tracking to compute modified rows in the warehouse and send only changed data to Mixpanel.
There are 3 aspects of DWH cost: network egress, storage, and compute.
- Network Egress: All data is transferred using gzip compression. Assuming an egress rate of $0.08 per GB and 100 compressed bytes per event, this is a cost of less than $0.01 per million events. Mirror and Append syncs will only transfer new or modified rows each time they run. Full syncs will transfer all rows every time they run. We recommend using Full syncs only for small tables and running them less frequently.
- Storage: Append and Full syncs do not store any additional data in your warehouse, so there are no extra storage costs. Mirror tracks changes using warehouse-specific functionality that can affect warehouse storage costs:
- Snowflake: Mirror uses Snowflake Streams. Snowflake Streams will retain historical data until it is consumed from the stream. As long as the warehouse connector runs regularly, data will be consumed regularly and only retained between runs.
- BigQuery: Mirror uses table snapshots. Mirror keeps one snapshot per table to track the contents of the table from the last run. BigQuery table snapshots have no cost when they are first created, as they share the underlying storage with the source table. However, as the source table changes, the cost of storing changes is attributed to the table snapshot. Each time the connector runs, the current snapshot is replaced with a new snapshot of the latest state of the table. The storage cost is the amount of changes being tracked between the snapshot and source table between runs.
- Databricks: Mirror uses Databricks Change Data Feed and all the changes are retained in Databricks for the delta.logRetentionDuration. Configure that window accordingly to keep storage costs low.
- Compute:
- Mirror on Snowflake: Snowflake Streams natively track changes; the compute cost of querying for these changes is normally proportional to the amount of changed data.
- Mirror on BigQuery: Each time the connector runs, it checksums all rows in the source table and compares them to a table snapshot from the previous run. For large tables, we highly recommend partitioning the source table. When the source table is partitioned, the connector will skip checksumming any partitions that have not been modified since the last run. For more details, see the BigQuery-specific instructions in Mirror.
- Mirror on Databricks: Databricks Change Data Feed natively tracks changes to the tables or views, and the compute cost of querying these changes is normally proportional to the amount of changed data. Mixpanel recommends using a smaller compute cluster and setting Auto Terminate after 10 minutes of idle time on the compute cluster.
- Append: All Append syncs run a query filtered on
insert_time_column > [last-run-time]; the compute cost is the cost of this query. Partitioning or clustering based on insert_time_column will greatly improve the performance of this query.
- Full: Full syncs are always a full table scan of the source table to export it.
Will I be charged for failed imports or errors?
No, you will only be charged for events that are successfully imported into Mixpanel. Events that fail validation or encounter errors during the import process will not count toward your billable data points.
How can I monitor my data usage with warehouse connectors?
You can track your data usage in Mixpanel by navigating to Organization Settings > Usage and viewing the “Data Points” section. Use the “Data Source” filter to specifically view warehouse connector imports.