Customers on an Enterprise or Growth plan can access Data Pipeline as an add-on package. See our pricing page for more details.
Design
Setting S3 Permissions
See Setting S3 PermissionsSetting Glue Permissions
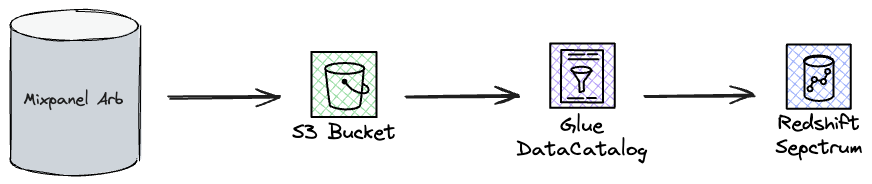
AWS Glue provides a robust data catalog service that facilitates seamless access to S3 data across various AWS services. Mixpanel writes and updates schemas in your Glue instance, ensuring that new data becomes quickly available. This section details configuring Glue permissions to manage the exported data in S3.Step 1: Create Glue Database
- Navigate to the AWS Glue service on the AWS console. Make sure you are in the same region as your S3 exported data.
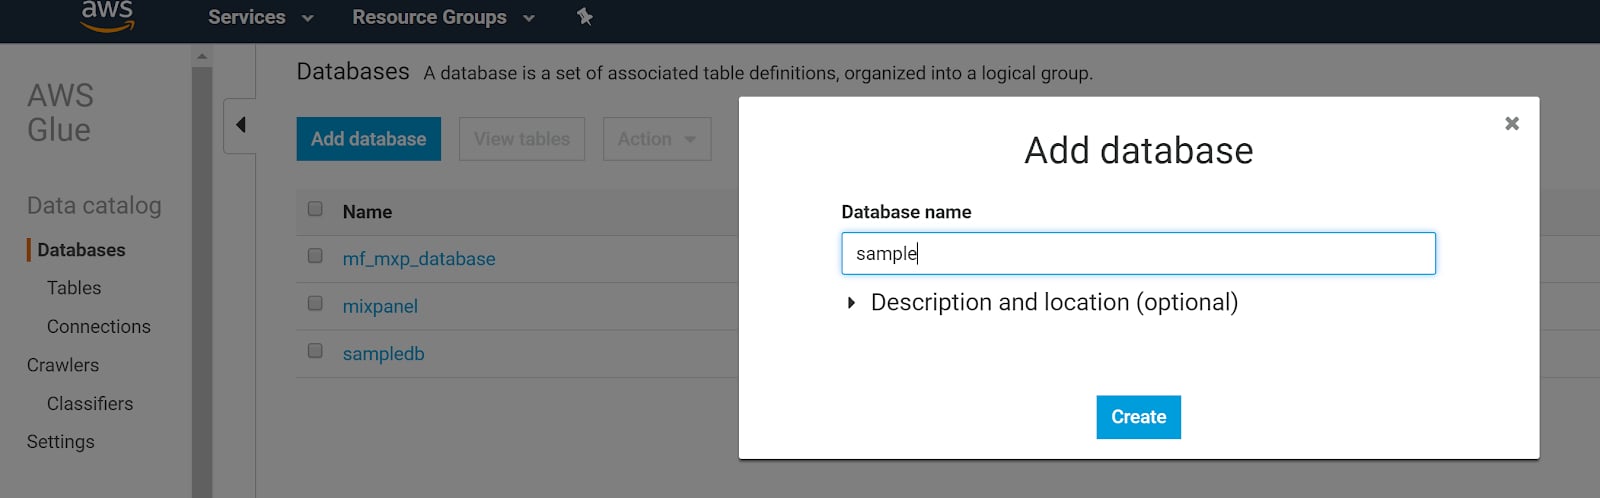
- Click Databases in the sidebar, then Add database.
- Name your database and click Create database.
Step 2: Create Data Modification Policy
Mixpanel partitions the Glue table by default if it has the proper AWS permissions. The partition key type and name arestring and mp_date respectively and the partition values are dates in the UTC timezone e.g. 2024-05-01. To enable partitioning in Glue, the policy must include partition-related permissions.
To enable Mixpanel to manage partitions (e.g., mp_date) and schemas in Glue, you need to grant specific AWS permissions:
- Go to the IAM service on the AWS console.
- Click Policies in the sidebar and then Create policy.
- Under the JSON tab, input the following policy to manage tables and partitions:
- Click Next and name the policy and Create policy.
Step 3: Create Access Role
- Go to the IAM service on the AWS console.
- Select Roles in the sidebar and click Create role.
- On the trusted entity page, choose AWS Account, then click Another AWS account, and enter
485438090326for the Account ID. - On the permissions page, locate and attach the policies you created in Step 2.
- On the review page, provide a name and description for this role and click Create role.
- Return to the IAM service, select Roles, and locate the role you just created.
- In the Trust relationships tab, click Edit trust policy.
-
Update the trust relationship with the following JSON and click Update policy.
Setting Redshift Spectrum Permissions
This section outlines the necessary steps for configuring permissions to allow Mixpanel to create external schemas in Redshift Spectrum.Step 1: Create Policy
Create a policy in IAM with the necessary permissions to enable Mixpanel to interact with Redshift Spectrum, Glue Data Catalog, and S3. Replace<BUCKET_NAME> with your actual S3 bucket name:
Step 2: Create Access Role
- Go to the IAM service on the AWS console.
- Select Roles in the sidebar and click Create role.
- On the trusted entity page, choose AWS Account, then click Another AWS account, and enter
485438090326for the Account ID. - On the permissions page, locate and attach the policies you created in Step 1.
- On the review page, provide a name and description for this role and click Create role.
- Return to the IAM service, select Roles, and locate the role you just created.
- In the Trust relationships tab, click Edit trust policy.
-
Update the trust relationship with the following JSON and click Update policy.
Step 3: Associate Access Role to Redshift
Once you’ve established the IAM role that enables Mixpanel to access both the external Data Catalog and Amazon S3, it’s essential to link this role with your Amazon Redshift Serverless instance. Use the steps below, and refer to IAM in Redshift Serverless for additional details:- Go to Amazon Redshift service on the AWS console
- Select Redshift Serverless and access the Namespace configuration for an existing workgroup
- Under Security and encryption tab, click Manage IAM roles
- Use the Manage IAM roles dropdown to select Associate IAM roles and then attach the role you created in Step 2.
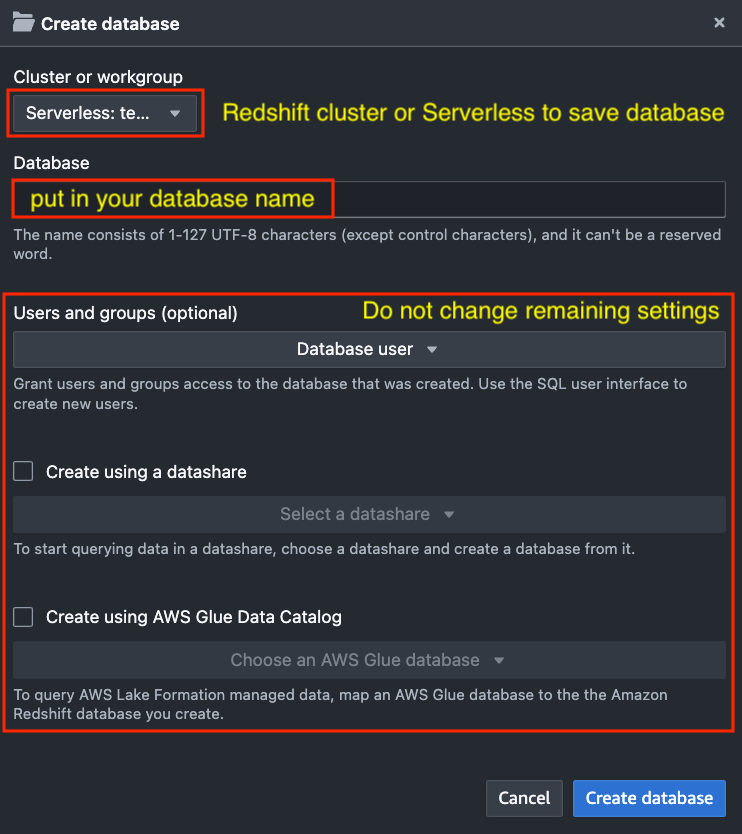
Step 4: Create Redshift Database
Create a new Redshift database or utilize an existing one. Here is how to create a new Redshift database: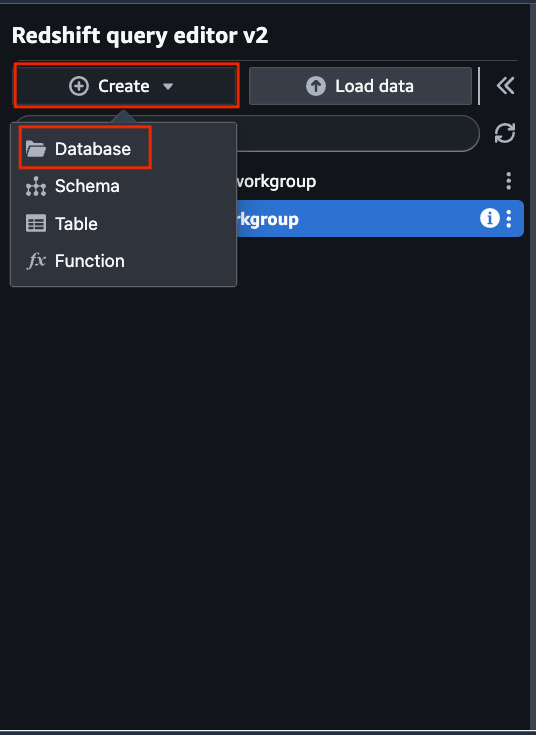
Step 5: Grant Privilege to Database User
To enable Mixpanel’s external schema creation for pipeline operations, grant theCREATE privilege to the federated database user associated with the IAM role. AWS recommends using federated identity for Redshift resource management, leveraging your organization’s identity system (e.g., AWS IAM) for authentication and authorization.
Important: Do not manually createFollow these steps to grant theIAMR:xxxusers via SQL commands. Redshift automatically generates a corresponding database user with theIAMR:prefix upon the first connection using the IAM role.
CREATE privilege:
-
Go to the CloudShell service on the AWS console and assume the IAM role. Replace
<role-arn>with the full ARN of the role you created in Step 2. -
If you get an “AccessDenied” error, your current AWS CLI role can’t assume the Mixpanel role. To fix this, edit the Mixpanel role’s trust policy to allow your current role to assume it. If you’re using SSO, add this to the trust policy, replacing
<your account id>with your AWS account ID: -
Configure AWS CLI with the temporary credentials.
-
Run this command in your terminal, replacing the placeholders with your actual values, and trigger the db user
IAMR:<mixpanel-role-name>creation in Redshift. -
Grant
CREATEprivilege. Click Query data in the Amazon Redshift console to open Query Editor v2. Connect using appropriate credentials and run the following SQL commands, replacing<your-database-name>and<mixpanel-role-name>with your actual values:
Provide Necessary Details for Pipeline Creation
Refer to Step 2: Creating the Pipeline to create data pipeline via UI. It is essential to provide specific details to Mixpanel: S3- Bucket: S3 bucket where Mixpanel data should be exported.
- Region: AWS region where your S3 bucket is located.
- Role: AWS Role ARN that Mixpanel should assume when writing to your S3, e.g.,
arn:aws:iam:::role/example-s3-role. - Encryption (optional): Specify the type of at-rest encryption used by the S3 bucket.
- KMS Key ID (optional): If using KMS encryption, you can provide the custom key ID that you wish to use.
- Database: Glue database to which the schema needs to be exported.
- Region: AWS region where your Glue Database is created.
- Role: AWS Role ARN that needs to be assumed for updating glue, e.g.,
arn:aws:iam:::role/example-glue-role.
- Workgroup Arn: Workgroup ARN for Redshift Serverless.
- Database: Redshift database where the external schema is created.
- Region: AWS region where your Redshift is located.
- Role: AWS Role ARN that Mixpanel should assume when creating schema to your database, e.g.,
arn:aws:iam:::role/example-redshift-role.
Queries
To query data in external schema created by Mixpanel, you need to ask admin to grant schema USAGE privilege to the federated database user.properties column in Redshift through the Query Editor. Here’s an enhanced example query that retrieves the distinct_id of users from San Francisco:
Supported AWS Regions
US-EAST-1, US-EAST-2, US-WEST-1, US-WEST-2, AP-SOUTH-1, AP-NORTHEAST-1, AP-NORTHEAST-2, API-NORTHEAST-3, AP-SOUTHEAST-1, AP-SOUTHEAST-2, CA-CENTRAL-1, CN-NORTH-1, CN-NORTHWEST-1, EU-CENTRAL-1, EU-WEST-1, EU-WEST-2, EU-WEST-3, EU-NORTH-1, SA-EAST-1, ME-SOUTH-1