Customers on an Enterprise or Growth plan can access Data Pipeline as an add-on package. See our pricing page for more details.
Design
Important: Please do not modify the schema of glue tables generated by Mixpanel. Altering the table schema can cause the pipeline to fail to export due to schema mismatches.
Exporting Mixpanel Data to Redshift Spectrum
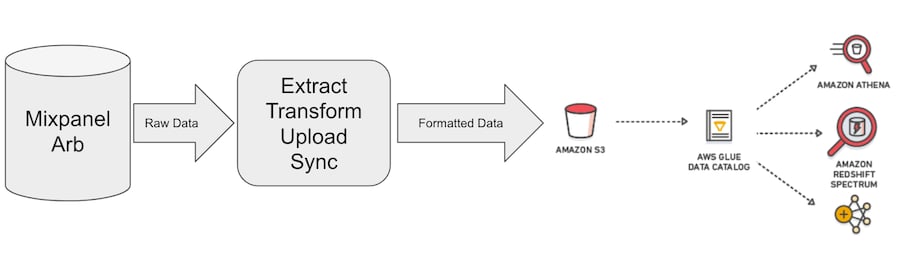
The following summarizes the steps to export Mixpanel data to an S3 bucket. Consult AWS documentation for AWS specific tasks, such as creating an S3 bucket and permissions. To prepare S3 for the incoming data:- Create a S3 bucket.
- Give Mixpanel the required permissions to write to the bucket.
- Configure Glue as shown below.
S3 Bucket Permissions
Mixpanel supports a wide range of configurations to secure and manage your data on S3. To access resources, the pipeline uses AWS cross-account roles. This section highlights the permissions you must give Mixpanel depending on the configuration of the target S3 bucket.Data Modification Policy
All exports from Mixpanel to AWS require that you create a new data modification policy, or add the following permissions to an existing data modification policy. Replacing<BUCKET_NAME> with your bucket name before inserting this JSON:
Server-Side Encryption
Mixpanel always sends data to your S3 bucket on a TLS encrypted connection. To secure your data at rest on S3, you can enable Server-Side Encryption (SSE). There are two options when using SSE: Encryption with Amazon S3-Managed Keys (SSE-S3) and Encryption with AWS KMS-Managed Keys (SSE-KMS)Encryption with Amazon S3-Managed Keys (SSE-S3)
This setting on your bucket encrypts data at rest using the AES-256 algorithm that uses keys managed by S3. If you are using this type of SSE, you only need to configure your pipeline by passing thes3_encryption=aes parameter when calling the Mixpanel Data Pipelines API. See AWS S3 and Glue Parameters.
Encryption with AWS KMS-Managed Keys (SSE-KMS)
You have a choice of keys if you use the Key Management Service (KMS). For S3 buckets, you can pick a default key namedaws/s3. If you opt to use the default key you don’t need any further configuration on AWS, and only need to configure your pipeline by passing s3_encryption=kms when calling the Mixpanel Data Pipelines API.
If you choose to use your own custom keys for encrypting the contents of your bucket, you will need to allow Mixpanel to use the key to encrypt the data properly as it is written to your bucket.
To achieve this, create an IAM policy that gives permission to Mixpanel to use the KMS key. Use the following JSON snippet and replace <KEY_ARN> with your custom key’s ARN:
s3_encryption=kms and s3_kms_key_id=<KEY_ARN> when calling the Mixpanel Data Pipelines API.
S3 Access Role
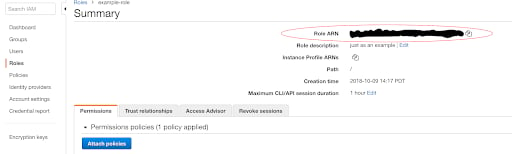
After creating the policies in the sections above, you must create a cross account IAM Role to assign the policies to the role.- Go to the *AWS IAM *service on the console.
- Click Roles in the sidebar.
- Click Create Role.
- Select **Other AWS Accounts **on the trust policy page and enter “485438090326” for the account ID.
- In the Permissions page, find and select the policies you created above.
- In the *Review *page, enter a name and description for the role and click Create Role.
- Navigate to the AWS IAM service in the console.
- Click Roles in the sidebar.
- Find and click the role you just created.
- Navigate to the Trust Relationships tab.
- Click Edit trust relationship.
- Replace the contents with the following JSON:
Using AWS External ID
Amazon introduced the use of external id for cross-account access because of the confused deputy problem. As Mixpanel uses cross account access to export data, you can make use of this feature to make the data transfer more secure. Mixpanel uses your project token as external ID when talking to AWS. In order to enable this, you simply need to edit the trust relationship you created as part of the previous step and add a condition to check the passed external id is in fact your Mixpanel project token. So, the final JSON for your trust relationship would be:Glue Configurations
Glue offers a data catalog service that will facilitate access to the S3 data from other services on your AWS account. This section describes how to connect Glue to the exported data in S3. You can select either of the following options:- Configure Glue for Mixpanel direct export (recommended)
- Configure Glue to use crawlers.
Configuring Glue for Mixpanel Direct Export
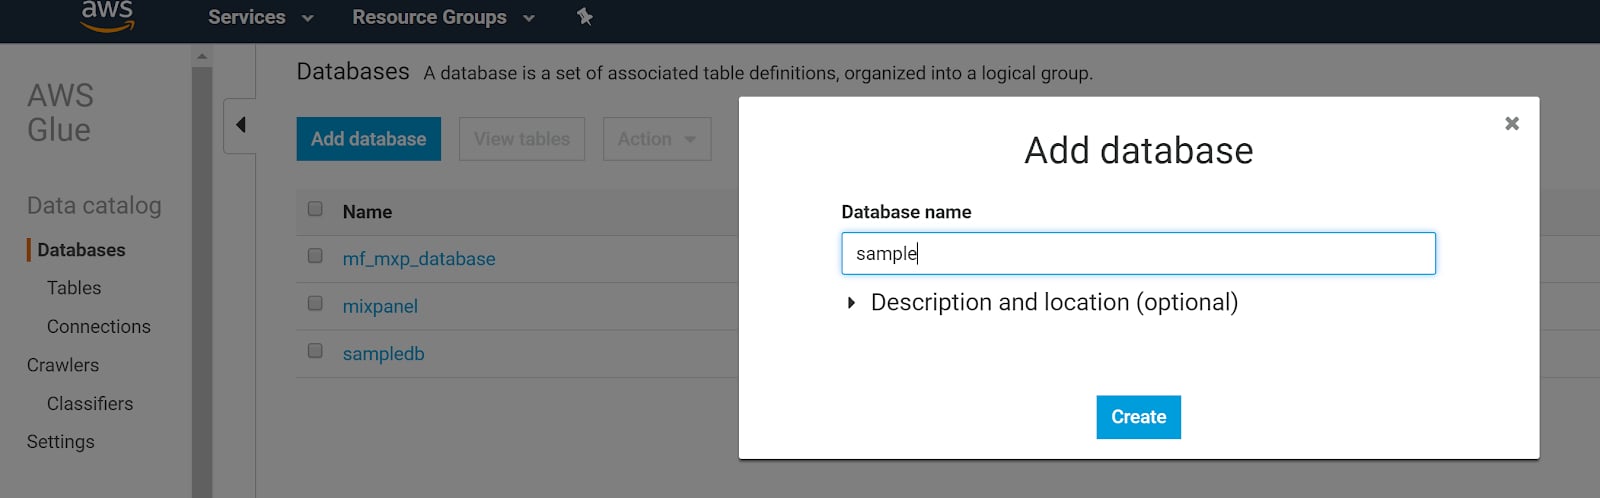
Mixpanel can write and update a schema in your Glue instance as soon as new data is available. To get more information about the table schemas, please see Schema. To set this up:- Create a Glue database.
- In the AWS console, go to “Glue”. (Make sure you are in the same region as your S3 exported data).
- Click Databases in the sidebar.
- Click Add Database.
- Enter a database name and click Create.
- Create an IAM policy.
- Go to the “AWS IAM” service on the console.
- Click Policies in the sidebar.
- Click Create Policy on the top of the screen.
- In the new screen, click the **JSON ** tab.
- Paste the following policy:
- Click Review Policy and give the policy a name in the next screen.
- Click **Create Policy **to save.
- Create an IAM Role and assign the Policy you created in Step 2.
- Go to the “AWS IAM” service on the console.
- Click Roles in the sidebar.
- Click Create Role.
- Select Other AWS Accounts on the trust policy page and enter “485438090326” for the account ID.
- In the “Permissions” page, find and select the policy you created in Step 2.
- In the Review page, enter a name and description for the role and click Create Role.
- Limit the trust relationship to the Mixpanel export user.
- Navigate to the “AWS IAM” service in the console.
- Click Roles in the sidebar.
- Find and click the role you created in Step 3.
- Navigate to the “Trust Relationships” tab.
- Click Edit trust relationship.
- Replace the contents with the following JSON:
- Save the contents.
Configuring Table Partitions in Glue
Mixpanel partitions the Glue table by default if it has the proper AWS permissions. The partition key type and name arestring and mp_date respectively and the partition values are dates in the project timezone e.g. 2021-02-03. To enable partitioning in Glue, the Glue Data Modification Policy must include the following actions:
Configuring Glue to Use Crawlers
You can configure Glue to crawl the S3 bucket with Mixpanel data. Glue crawlers are convenient because they automatically extract the schema from the data files and update the Glue schema. This convenience, however, can also pose issues, such as:- The run time of the crawlers could be out of sync with Mixpanel’s export schedule. As a result, it can prevent you from using your data as soon as new properties are available.
- The time column is interpreted as an integer. As a result, it is more difficult to perform timestamp operations.
- When using the one table per event schema option, Glue crawlers can merge data from multiple events in one table based on similarity.
Setting up Redshift
When the data catalog and table definitions are available in Glue through either of the aforementioned means, you can connect your Redshift cluster to the catalog and query it from Redshift. AWS documentation walks through the process in detail. The following is an overview of the process. To properly configure Redshift:- Create an IAM role with read access to Glue and the S3 bucket containing your Mixpanel data.
- Assign that role to your Redshift cluster.
- After you insert your role and the database name in the following SQL query, run it as cluster admin:
Queries
You can query data with a single table schema or with a multiple table schema in Redshift Spectrum. To get more information about the table schemas, please see Schema. To query a single table schema, use this snippet.CLEANED_EVENT_NAME is the transformed event name based on transformation rules.