Currently using Google Analytics 4 (GA4) and not seeing value?
Try unifying your marketing and product data in one place. This guide will outline the steps needed in order to bring your GA4 data into Mixpanel allowing you to dig deeper into how users across different channels are interacting with your product, learn where the points of friction are, and where you should be investing your marketing spend to maximize engagement with your product.Loading historical data
Given GA4 has a similar data format to Mixpanel, it is possible to migrate some of your historical data to see trends. In the cases where historical data is essential, we recommend loading a year’s worth (or less) of historical data during your migration. This will allow your team to review year-over-year trends easily and do historical analysis as needed. Note that backfilling historical data can have significant impact on your billing. Refer to this section for more details.Loading historical data via Mixpanel BigQuery Warehouse Connector

- Set up a new Mixpanel project which is on Simplified ID Merge system.
- Set up GA4 BigQuery Export following the instructions here.
- Set up Mixpanel Warehouse Connector to initiate data sync from BigQuery to Mixpanel
Pre-migration data audit
Before migrating your data to Mixpanel, you should conduct a data audit to quickly identify the key events and properties that you want to migrate over. You can learn more about the importance of pre-migration data audit here. The following SQL queries can be used to conduct a data audit in BigQuery. SQL query to return events by volume:Setting up BigQuery Warehouse Connectors
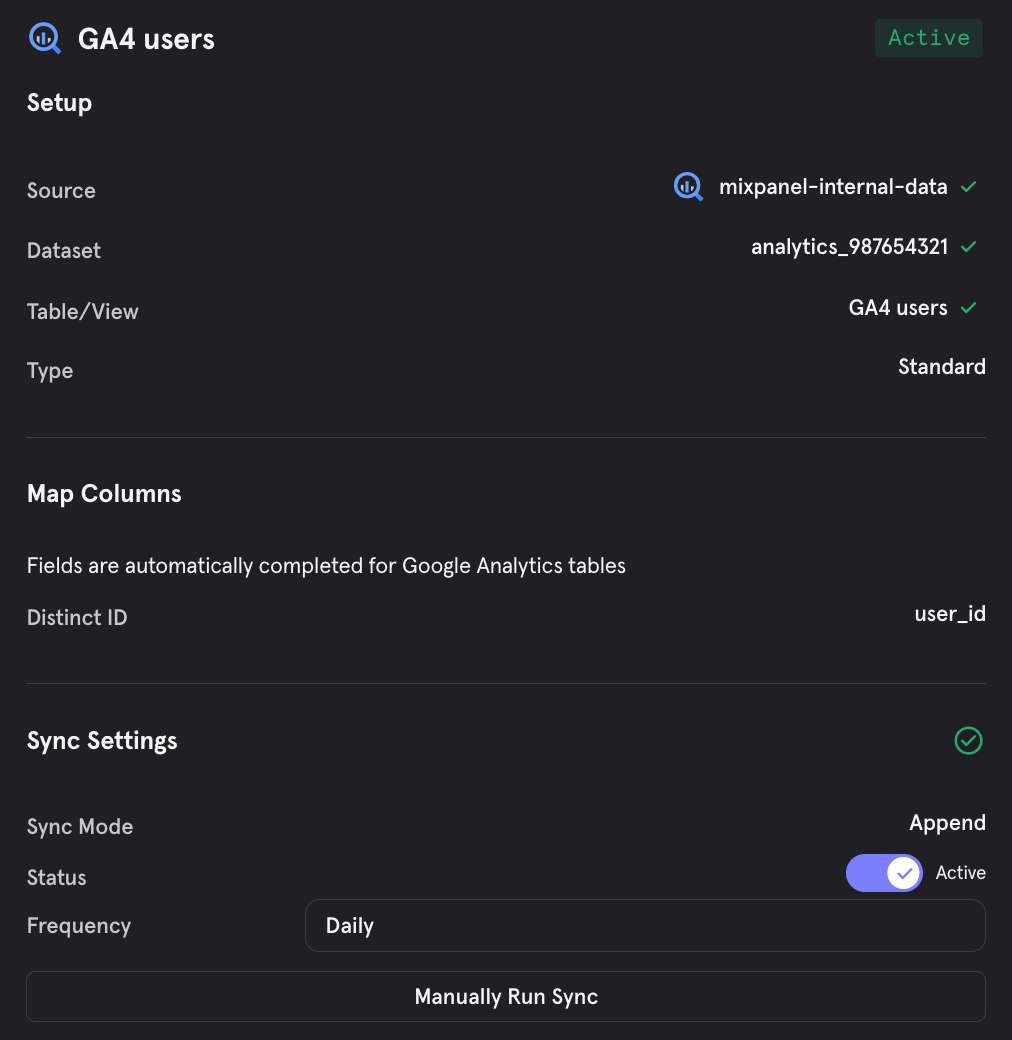
Our Warehouse Connector will automatically detect GA4 datasets in BigQuery. You can use this to migrate your historical data from BigQuery to Mixpanel as well as seamlessly import new data going forward. Once you’ve given your new Mixpanel project, that is leveraging Simplified ID Merge, access to your BigQuery Instance in the Warehouse Sources tab of your project settings it’s time to import your data. Navigate to Project Settings → Warehouse Data and click +Event Table. Under setup select your BigQuery source you gave Mixpanel access to. In the dataset drop-down, choose your GA4 dataset, then select the GA4 events table. Your Event Name, Event Time, and Distinct ID columns will automatically map for you. If you’re tracking users in an anonymous state with GA4 you can select user_pseudo_id for the Device ID column. Under sync settings select One Time to backfill the data or Append to bring in new data based on Insert Time (sync mode doesn’t include Mirror, only Append and One Time). If you choose Append for Sync Mode, set the frequency to daily. Insert time will default to event_timestamp. Preview the events and associated event properties to ensure the data looks as expected then select Create to import the data into Mixpanel.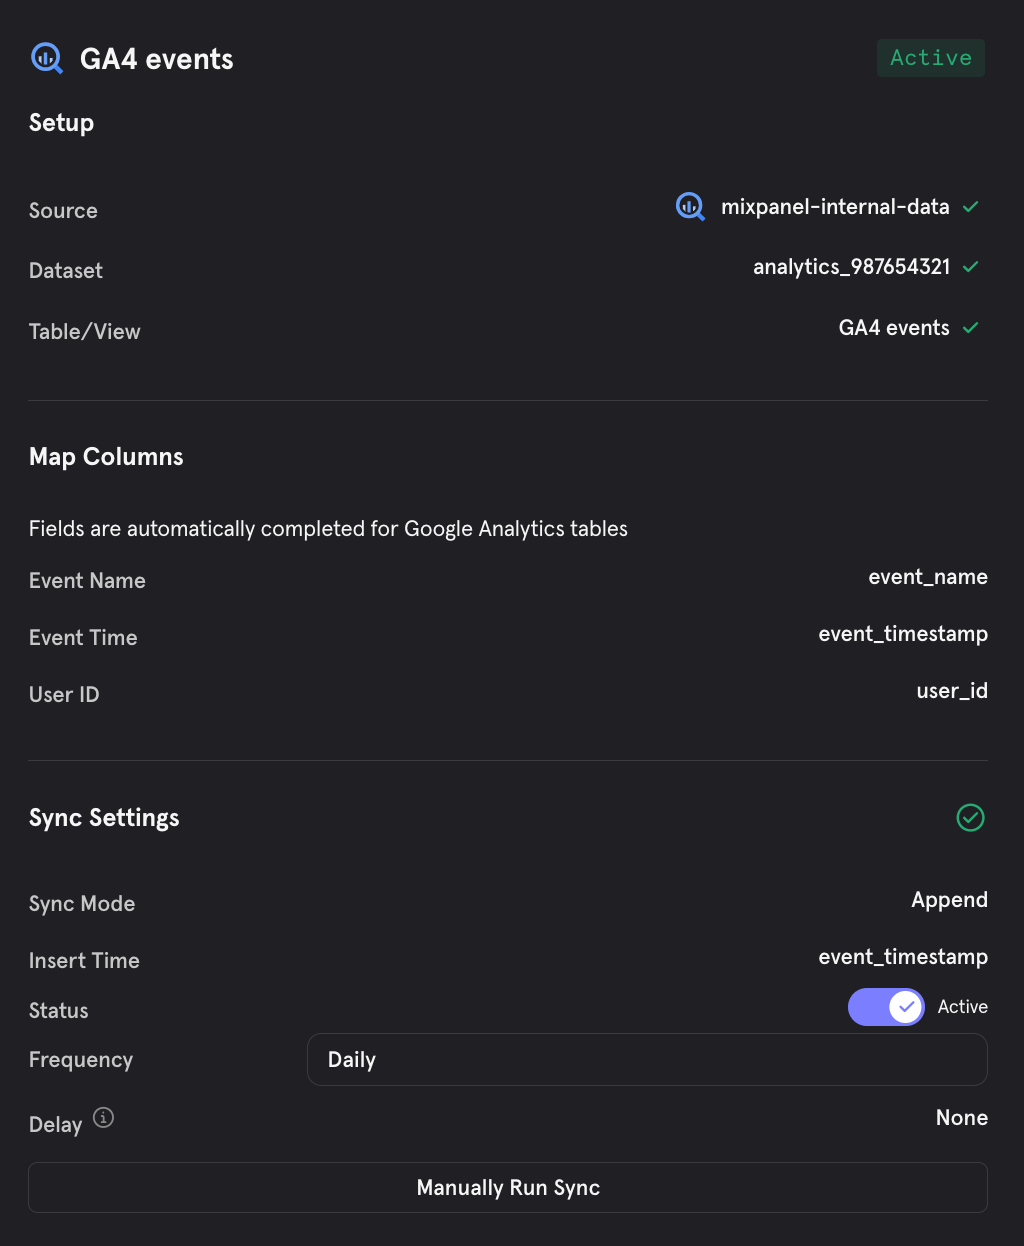
GA4 Append syncs use BigQuery’s change history (time travel) to detect newly appended rows. BigQuery retains change history for up to 7 days (configurable, minimum 2 days). If the Mixpanel sync does not run within this window, it must be reset for a full re-sync. We recommend keeping the default of 7 days to allow time to correct any unexpected access issues (e.g., a credentials change).
Post-migration data validation
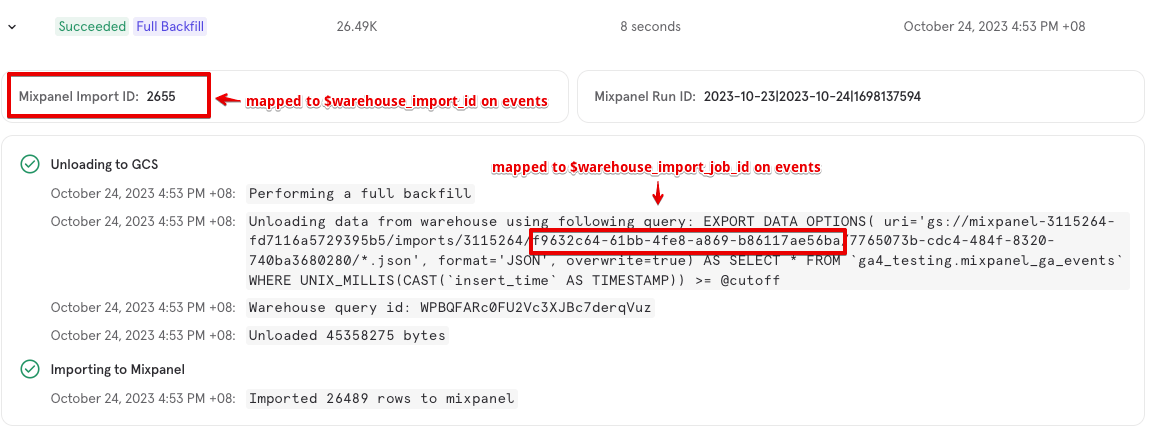
You can use our Lexicon or Events page to check that your data has successfully been ingested. However, if your historical events are older than 30 days, they will not show up on Lexicon, Events page or in the event dropdown menu across all reports. In this case, you can leverage our Insights report to validate the historical events, by selecting the import time frame and filtering by the following default properties:- Warehouse Import ID (tracked as
$warehouse_import_id) - Warehouse Import Job ID (
$warehouse_import_job_id) - Import = true (
$import) - Source = warehouse-import (
$source)
Track forward looking real-time data
The Warehouse Connectors support for GA4 allows you to automatically bring in your event and user data. But if you’re looking to replace tracking for your current GA4 implementation, you can follow the steps below to send live data to Mixpanel.Client-side SDKs & Server-side SDKs
Mixpanel and GA4’s client-side SDKs have very similar developer facing APIs. This makes it fairly easy to “find and replace” embedded GA4 calls and swap them for Mixpanel calls. This section will detail the Javascript SDKs (for the sake of brevity), although both analytics platforms have fairly uniform tracking APIs for other SDKs (mobile, server-side, etc.)Events
GA4 methodIdentity Management
GA4 methodUser Properties
GA4 methodSuper Properties
GA4 method → GA4 doesn’t have a direct equivalent, but you can set global properties on the SDK config we recommend moving to MixpanelGoogle Tag Manager (GTM)
Mixpanel has a Google Tag Manager (GTM) custom template which can be leveraged to implement events within an hour. Simply load the template, and you can send Mixpanel the same events you’ve setup for your GA4 instance. This method is straightforward since you’ve already setup your SDK to track “events” and are using Google Tag Manager. You can leverage this same setup to implement Mixpanel.Customer Data Platforms (CDPs)
CDPs like Segment will already be tracking events to GA4 that you want to duplicate to Mixpanel. You can add Mixpanel as a destination to your CDP and immediately start receiving the same data as your other destinations. CDPs like Segment have always tracked event data and synthesized them into sessions for Universal Analytics. You can add Mixpanel as a destination to your CDP and immediately start receiving the same data as your other destinations. Since CDPs already collect all your data via 1 SDK and route to many downstream destinations, enabling Mixpanel is straightforward. Simply go to your CDP settings and add Mixpanel as a destination:
- Which events and properties to send → only send what matters
- Edit any mappings/editing/filtering that has to be done on the data → ensure high data quality and governance
- Connection settings, or CDP specific settings for data syncs → control over how data is sent
Currently using Universal Analytics with Google?
Differences in the data models
Mixpanel’s data model is based on events and properties, rather than sessions. While this might be a shift if you come from the sessions-based model, we’ve found it to be both more flexible and easier to set up and use.- Events capture granular user actions, like a Pageview, Signup, or Purchase.
- Properties capture attributes of those events, like which page was viewed, the UTM Campaign that led to a Signup, or the Item that was purchased.
Track forward looking real-time data
Choose your current implementation method for Universal Analytics (UA) and you can follow the below steps for starting to send live data to Mixpanel.Client-side SDKs & Server-side SDKs
You’ll have to setup Mixpanel fresh given Mixpanel leverages an event-based model that does not exist in Universal Analytics. The good news is you can get started within an hour, which is lesser or equivalent work to setting up GA4 from an SDK perspective, since both need a fresh implementation to be setup on an “events” model vs UA’s “sessions” model. We recommend the following steps to get started quickly:-
Configure the Mixpanel JavaScript SDK to automatically track page views, where UTM params are tracked by default
-
Track a few key conversion events of interest
- Use the Mixpanel Marketing KPI Template to build your initial board
Google Tag Manager (GTM)
Mixpanel has a Google Tag Manager (GTM) custom template which can be leveraged to implement events within an hour. The template initializes the Mixpanel JavaScript SDK with similar calls as outlined in the above section. We recommend setting up the following in the custom template to get started quickly: a) Choose to auto-track pages, b) Set your conversion events. Once done, Mixpanel will start receiving page views and key conversion events.Customer Data Platforms (CDPs)
CDPs like Segment have always tracked event data and synthesized them into sessions for Universal Analytics. You can add Mixpanel as a destination to your CDP and immediately start receiving the same data as your other destinations. Since CDPs already collect all your data via 1 SDK and route to many downstream destinations, enabling Mixpanel is straightforward. Simply go to your CDP settings and add Mixpanel as a destination:- Which events and properties to send → only send what matters
- Edit any mappings/editing/filtering that has to be done on the data → ensure high data quality and governance
- Connection settings, or CDP specific settings for data syncs → control over how data is sent
Loading historical data
Mixpanel’s data model is fundamentally different from UA. As such, the process of importing old data with a different format has many potential issues - identity management, data discrepancies, etc. It may be worth considering your use cases for importing old data before proceeding, as matching users and data across the systems can be time consuming. Mixpanel Support is here to help if you need advice how to go about importing the historical data. Consequently, for most cases, we recommend starting fresh when migrating from UA. In the cases where historical data is essential, we recommend loading a year’s worth (or less) of historical data during your migration. This will allow your team to review year-over-year trends easily and do historical analysis as needed. To backfill data, we recommend:- If you have a CDP, this should be straightforward
- Utilize the CDP’s backfilling feature, like Segment Replay, to re-send historical data to Mixpanel
- For any other implementation method
- First, export your data to the data warehouse so you have a record of Universal Analytics
- Once exported, your data warehouse tables can be transformed and modeled into the event format Mixpanel expects
- Leverage our Import API to send us the formatted events from your data warehouse