Overview
This developer guide will assist you in configuring your Flutter app for Session Replay using the Session Replay SDK (Flutter). Learn more about viewing captured Replays in your project here.Best Practices
Session Replay provides powerful insights into user behavior, but it also introduces risks, especially on mobile. These risks are not unique to Mixpanel; they are common across the entire session replay product category. Because SDKs run on end-user devices and screen content may include sensitive data, we recommend implementing / testing Session Replay carefully. Be especially cautious with masking, edge-case testing, and rollout strategies. For more information on risk categories and best practices, read more here.Prerequisites
- You are already a Mixpanel customer.
- [Optional] We recommend having the latest Mixpanel Flutter SDK installed. The Mixpanel Flutter SDK provides a
distinctId(viamixpanel.distinctId) that you can pass to Session Replay during initialization to associate replays with your Mixpanel analytics identity.
Installation
Add to yourpubspec.yaml:
VERSION with the latest version available on pub.dev.
Then run flutter pub get to install the package.
Initialize
Session Replay requires initializing an instance and wrapping your app withMixpanelSessionReplayWidget. The SDK does not use a singleton — store the instance using State, Provider, or whichever state management fits your app.
Pass the instance to MixpanelSessionReplayWidget to begin capturing. Initialize asynchronously to avoid delaying your app’s first frame — the widget handles transitioning from a null instance to an initialized one.
Data Residency
If your Mixpanel project lives in the EU or India data center, or you route all Mixpanel traffic through a self-hosted proxy, setserverUrl on SessionReplayOptions. The SDK exposes a DataResidency class with the managed region URLs so you don’t have to hardcode them.
Example Usage
Quick Start
Here’s a quick overview of some available controls. For a more in-depth guide, continue reading.MixpanelMask, MixpanelUnmask, and auto-masking interact.
Capturing Replays
By default, recording begins automatically upon initialization, configurable via theautoRecordSessionsPercent option.
Sampling
We recommend using automatic sampling for most use cases. Use manual capture if you need control over exactly when recording starts and stops. To enable Session Replay, setautoRecordSessionsPercent between 0.0 and 100.0. At 0.0, no sessions are recorded. At 100.0, all sessions are recorded.
To start, we recommend using a 100% sampling rate to ensure replay capture is behaving as expected, then adjust according to your specific analytics needs.
Manual Capture
To programmatically start and stop replay capture, use the.startRecording() and .stopRecording() methods.
Start capturing replay
When calling .startRecording(), recording will begin with the sample rate that was passed to sessionsPercent (100% default).
.startRecording() has no effect if recording is already in progress.
Stop capturing replay data
Call .stopRecording() to stop any active replay data collection. The SDK automatically stops recording when the app loses focus.
Additional Configuration Options
Upon initialization you can provide aSessionReplayOptions object to customize your replay capture.
Example usage:
Platform Options (mobile only)
Debug Options
When non-null, enables debug features such as colored overlays showing masked, auto-masked, and unmasked regions.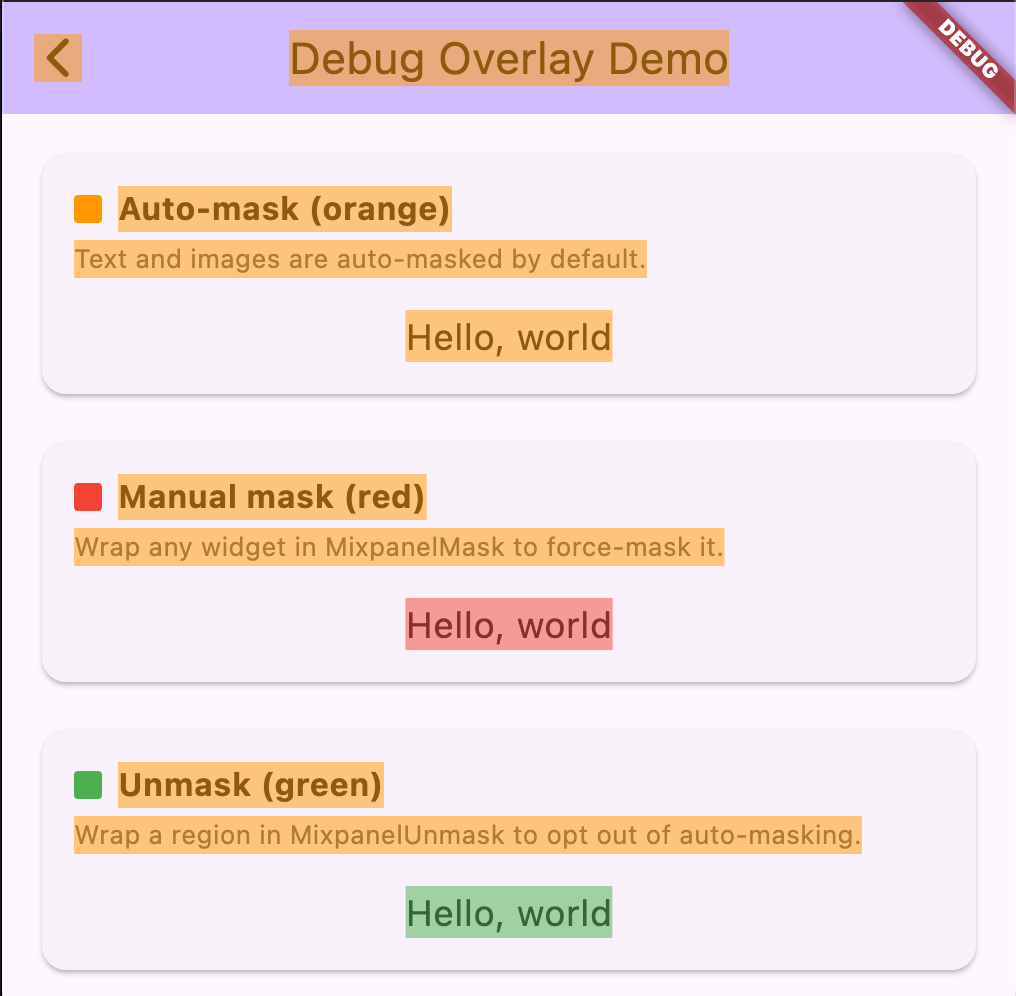
- Debug builds only. The overlay is gated on Flutter’s
kDebugMode, so it only renders in debug builds and is a no-op in profile and release builds. - Visible on the device, never in the replay. The colored rectangles are painted on top of the boundary the SDK captures, so they sit outside the recorded screenshot. The replay sees the SDK’s own opaque masks applied to the captured image, not the debug colors. The overlay is also non-interactive — it sits behind an
IgnorePointer, so taps still reach your app. - Refreshes per capture, not per frame. Mask region detection runs as part of the screenshot pipeline, so the overlay updates each time a new capture completes — at most once every ~500ms while the UI is active, not on every Flutter frame. During fast interactions or animations you may briefly see overlay rectangles in stale positions until the next capture catches up.
Identity Management
The Mixpanel distinct ID for the current user can be passed into the initializer and changed at runtime by calling the.identify() method:
Manual Flushing
You can flush any currently queued session replay events at any time by calling.flush():
Remote Configuration
Available only for customers with a paid session replay add-on.
remoteSettingsMode you can quickly set SDK options for your project in Mixpanel under Settings > Organization Settings > Session Replay.
Three modes are available:
RemoteSettingsMode.disabled(default): Do not use remote configuration and proceed to use the SDK initialization config provided inMixpanelSessionReplay.initialize.RemoteSettingsMode.fallback: Attempt to retrieve remote configuration and proceed with those settings. If there is a failure or timeout, will use previously cached remote settings (from last successful fetch) or the SDK initialization config.RemoteSettingsMode.strict: Requires a successful remote configuration fetch. If the fetch fails, recording is disabled and no replays will be sent.
autoRecordSessionsPercent
Replay ID
When a replay capture begins, a Replay ID is generated by the SDK and is attached as an event property ($mp_replay_id) to events tracked by the Mixpanel SDK during the capture session. Events containing the same $mp_replay_id will appear in the same Replay.
If you are sending any events not coming from the Mixpanel SDK, add the $mp_replay_id event property to attribute the event to a specific Replay.
You can read the active Replay ID from the replayId property on your MixpanelSessionReplay instance. The property will be null if there is no active replay capture in progress.
Server-Side Stitching
Server-Side Stitching allows you to easily watch Replays for events that were not fired from the SDK. It works by inferring the Replay that an event belongs to using the Distinct ID and time property attached to the event. This is especially useful if you have events coming in from multiple sources. For example, let’s say a user with Distinct ID “ABC” has a Replay recorded from 1-2pm. Two hours later, an event was sent from your warehouse with a timestamp of 1:35pm with Distinct ID “ABC”. Server-Side Stitching will infer that the event should belong in the same Replay. To ensure Server-Side Stitching works, callidentify() from the client-side using our SDK with the user’s $user_id. This guarantees that events generated from both the client-side and server-side share the same Distinct ID. Learn more about identifying users.
Logging
Developers can enable or disable logging with thelogLevel option of the SessionReplayOptions object.
Debugging
$mp_session_record is exempt from your plan data allowance.$mp_session_record) also appears in your project; you can use this to verify that Session Replay is implemented correctly.
If you are using the recommended sampling method to capture your Replays but having trouble finding the Replays in your project, try calling .startRecording() manually and see if the $mp_session_record event appears. If it does appear but you are still struggling to locate your Replays, you may want to increase your sampling rate.
Troubleshooting
If you are still struggling with either of the following common issues:- Replays are not showing up in my project
- Replays are not displaying my UI correctly
- Whether your issue is with iOS, Android, macOS, or all platforms
- Your Session Replay code snippet
- Where you initialize the Session Replay SDK
- Any relevant logs (enable with
logLevel: LogLevel.debug) - (If applicable) A link to a replay showing the issue
- (If applicable) A screenshot of the UI or a description of the expected behavior
Privacy
Mixpanel offers a privacy-first approach to Session Replay, including features such as data masking. Mixpanel’s Session Replay privacy controls were designed to assist customers in protecting end user privacy. Read more here.User Data
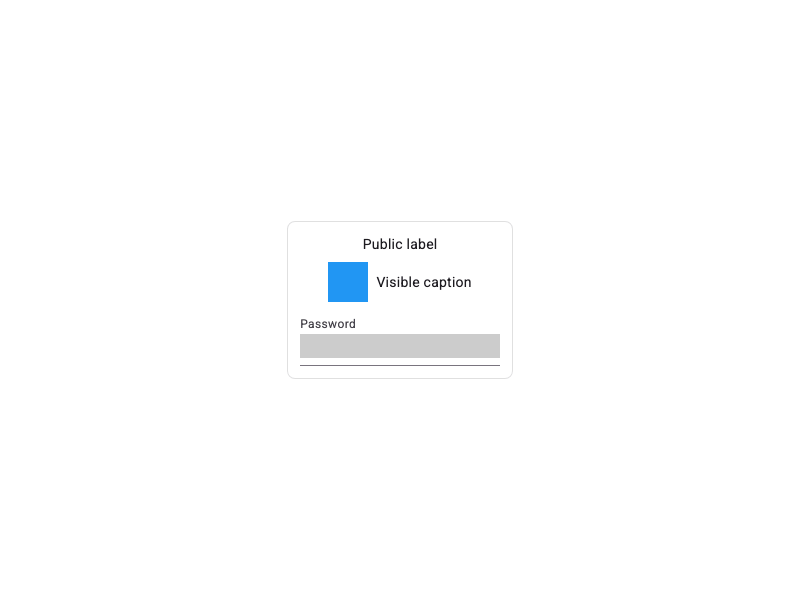
The Mixpanel SDK will always mask all detected text inputs. To protect end-user privacy, input text fields cannot be unmasked. By default, we attempt to identify all text and image views. You can unmask these elements at your own discretion using theautoMaskedViews config option. See Masking Behavior for detailed examples of how masking directives interact.
Mark Widget Sensitivity
All text input widgets (TextField, TextFormField, CupertinoTextField) are masked by default. Text inputs cannot be unmasked.
Wrap any widget with MixpanelMask to force masking, or MixpanelUnmask to prevent auto-masking. These directives apply to the entire subtree.
Masking Behavior
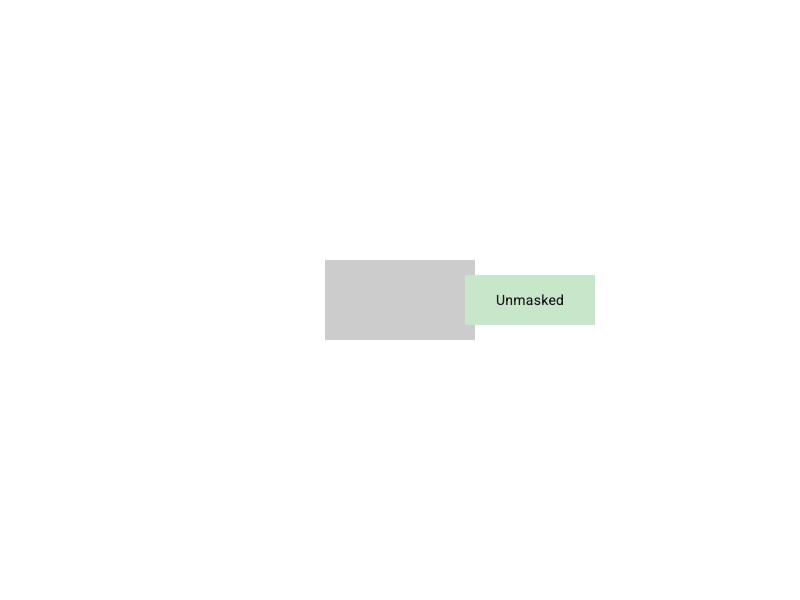
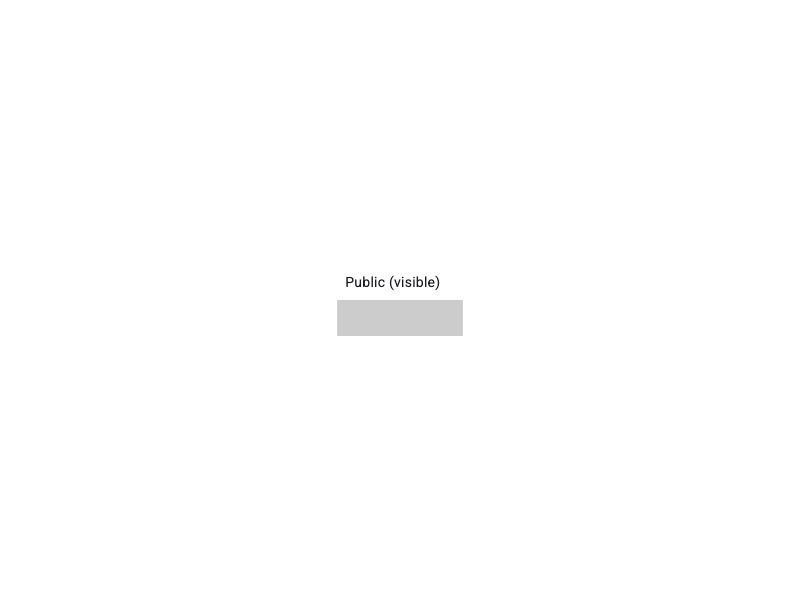
This section documents howMixpanelMask, MixpanelUnmask, auto-masking, and security masking (text entry) interact during view tree traversal. All examples below use autoMaskedViews: {image} — text is not auto-masked, image is auto-masked.
Sensitive Container

MixpanelMask masks all descendants — auto-masking config is irrelevant.
Insensitive Container
MixpanelUnmask overrides auto-masking. Text entry is always masked regardless.
Sensitive Container with Overflow

MixpanelMask > MixpanelUnmask

MixpanelMask > MixpanelUnmask with Overflow
MixpanelUnmask > MixpanelMask
MixpanelMask overrides the outer unmask for its subtree.
Text Entry Security
TextField, CupertinoTextField, EditableText) are always masked regardless of directives or auto-masking config.
Auto-masking (no explicit directive)

autoMaskedViews config. Text entry is always masked regardless.
Retention
By default, Mixpanel retains Session Replays for 30 days from the date the replay is ingested and becomes available for viewing within Mixpanel. Customers on our Enterprise plan can customize this retention period between 7 days and 360 days. Once a replay is expired, there is no way to view that replay.FAQ
How does Session Replay work in Flutter?
Session Replay observes user interactions within your app, capturing UI hierarchy changes and storing them as images, which are then sent to Mixpanel. Mixpanel reconstructs these images, applying recorded events as an end-user completes them. Within Mixpanel’s platform, you can view a reconstruction of your end-user’s screen as they navigate your app. However, Session Replay is not a literal video recording of your end-user’s screen; end-user actions are not video-recorded.Can I prevent Session Replay from recording sensitive content?
The Mixpanel SDK will always mask identifiable text inputs. By default, all text and images on a page are also masked. Additionally, you can customize how you leverage our SDK to fully control (1) where to record and (2) whom to record. Consider the manual capture example scenarios, SDK configuration options, and manual widget masking provided above to customize the replay capture of your implementation. See Masking Behavior for detailed examples.How can I estimate how many Replays I will generate?
If you already use Mixpanel, the Session Start events are a way to estimate the rough amount of replays you might expect. This is especially true if you use timeout-based query sessions. However, because our sessions are defined at query time, we cannot guarantee these metrics will be directly correlated. When you enable Session Replay, use the above proxy metric to determine a starting sampling percentage, which will determine how many replays will be sent. You can always adjust this as you go to calibrate to the right level.How does Session Replay affect my app’s bandwidth consumption?
The bandwidth impact of Session Replay depends on the setting of thewifiOnly parameter.
By default, wifiOnly is set to true, which means replay events are only flushed to the server when the device has a wifi connection. If there is no wifi, flushes are skipped, and the events remain in the local disk queue until WiFi is restored. This ensures no additional cellular data is used, preventing users from incurring additional data charges.
When wifiOnly is set to false, replay events are flushed with any available network connection, including cellular. In this case, the amount of cellular data consumed depends on the intensity of user interactions and the typical session length of your app. Users may incur additional data charges if large amounts of data are transmitted over cellular connections.
How does Session Replay for mobile work if my app is offline?
Session Replay events are saved to a local disk queue when no network connection is available (or whenwifiOnly is true and there is no WiFi). The SDK will automatically flush queued events once a suitable connection is restored. However, the queue is not persisted across app restarts — any events that have not been flushed before the app is terminated will be lost.
Does Mobile Session Replay work with my CDP?
Yes — but only if the Mixpanel Session Replay SDK is installed client-side. Mobile Session Replay is compatible with CDPs like Segment and mParticle, but you must integrate the Mixpanel Flutter Session Replay SDK directly in your app. Without it, replays won’t be captured. Key Considerations:- If you’re using Segment server-side, session replays will not be recorded, since the SDK isn’t running in the app.
- The Mixpanel Session Replay SDK is separate from the standard Mixpanel tracking SDK. You do not need the regular SDK, but the Replay SDK must be configured with a
distinctIdand project token. - Events can be linked to replays either by:
- Manually attaching the current replay ID (
$mp_replay_id) to each event - Using server-side stitching after the fact
- Manually attaching the current replay ID (